Introduction
Counter-Strike is the most popular shooter game in the world, and it has been for quite some time. With the release of CS2, we can’t really see the game’s popularity dwindling over the next couple of years. The competitive scene is extremely healthy, the game is receiving regular updates, and the switch to the Source 2 engine means that the sky is the limit for this game. In our full CS2 settings and options guide, we’ll guide you through all of the settings and options that you can (or sometimes should) tweak in order to get the best out of your game.
Update 26th of April 2024:
Big CS2 Update
In a big CS2 patch, Valve made changes to weapon kill rewards (see our CS2 economy guide) and swapped Overpass for Dust 2 in the Premier/competitive map pool. No graphical or performance changes were listed, but we tested our current recommended settings to make sure that they still run as smoothly as we want them to.
Best CS2 Video Settings
CS2 Video Settings
| Color Mode | Use Computer Monitor here, it’s the best for color accuracy |
| Aspect Ratio | This depends on the resolution you’re going for (and whether you want black bars to the side or you want the image to be stretched if you’re using a custom res) but if you’re not using a custom resolution, use your monitor’s native aspect ratio. |
| Resolution | We recommend using your monitor’s native resolution. If you’re really lacking for frames or you want to try the pro approach by changing your res, you can always lower the resolution. The lower your resolution, the higher the framerate gains will be, generally speaking. |
| Display Mode | Use fullscreen here. |
| Refresh Rate | Use your monitor’s native refresh rate. |
| Boost Player Contrast | This makes player models stand out a little more. We recommend enabling this. |
| Wait for Vertical Sync | V-Sync can cause input lag, so disable this. |
| Multisampling Anti-Aliasing Mode | This doesn’t have a tremendous effect on performance, but we recommend CMAA2, as turning this off will make the game look rather jagged. |
| Global Shadow Quality | Set this to high. Some player shadows don’t appear on lower settings, and not seeing those shadows will put you at a tremendous disadvantage. |
| Model/Texture Detail | We set this to medium because at low, things such as blood splatters can sometimes get blurry. If you’re a skins fan, you might want to set it to high or very high, since anything lower causes intricate details on certain skins (such as drawings) to become blurred right now. |
| Texture Filtering Mode | This has a rather limited effect on framerates (~10 frames between the highest and lowest setting) or visuals, but Anisotropic 4x feels best to us. Some users have reported a laggy feeling when using bilinear or trilinear, so we recommend going with Anisotropic 4x. |
| Shader Detail | This is merely an eye-candy setting, so we set it to low. If you’re a fan of pretty effects (such as the Doppler finishes) interacting with the light then you should set it to high though, as it’ll make the effects prettier. |
| Particle Detail | Set this to low, as it’s an eye-candy setting that’ll make particles (explosions etc.) look more realistic at higher settings. Turning it down even makes it easier to see through smokes and other particles, so setting this to low can give you a minor competitive advantage. |
| Ambient Occlusion | Enabling this causes quite a big performance hit, so we would suggest leaving it disabled. Ambient occlusion is a shading and rendering technique that’s used to calculate how different objects react to ambient lighting, so it does nothing for your competitive performance. It does impact some shadows, but those won’t influence your gameplay experience, as the player shadows are influenced by the Global Shadow Quality setting. |
| High Dynamic Range | In our testing, we didn’t notice a big difference between different settings here. If you’re a competitive player we’d suggest setting this to performance, as you don’t need the increased quality that HDR offers for gameplay. |
| FidelityFX Super Resolution | This basically renders the game at a lower resolution and upscales certain sections of the image, but it makes the game look extremely blurry and grainy to the point where it’s distracting to us, so we’d recommend disabling this. |
| NVIDIA Reflex Low Latency | NVIDIA Reflex lowers your overall system latency, so we recommend going for at least enabled here, as it’ll make the game more responsive. If you have enough frames to spare, you can also go for enabled + boost, which will reduce your overall latency even more, but it might cost you some frames, so if you’re already ‘on the edge’ when it comes to frames you might want to experiment with this setting a bit. |

Launch Options
Make sure that your drivers are up to date when playing/testing CS2. It’s also a good idea to add ‘-high‘ to the launch options of the game, as this will launch the game in high priority mode. You can do this by right clicking the game in Steam, and then clicking ‘Properties‘ -> ‘General‘.
Also read: Best Monitor for CS2
Disable Animated Avatars
CS2 now allows animated avatars, but these can become extremely distracting, especially if you’re in a match where a lot of players use one of these avatars. You can easily disable these by navigating to Settings -> Communication -> Game -> ‘Allow Animated Avatars‘. If you select No here you won’t be bothered by these pesky animated avatars anymore.
CS2 Game Settings
Under Settings -> Game you’ll find a couple of interesting settings you can tweak to improve your game’s performance.
| Max Acceptable Matchmaking Ping | CS2 prioritizes servers that are close to you, but if you are having trouble with laggy servers or matches, it can be a good idea to lower this value. |
| Display Network Connection Issues | Set this to automatically so that the game tells you’re experiencing network instability. |
| Max Acceptable Game Traffic Bandwith | Set this to unrestricted. |
| Buffering to smooth over packet loss | This is basically the ‘cl_interp_ratio’ setting that many people used in CS:GO. We recommend leaving it on None (which is the default) but you can play around with this setting for a bit and see if an other setting feels better. If you experience packet loss (which you can see by enabling ‘Display Network Connection Issues’) you can always set this to 1 or 2. |
| Enable Developer Console (~) | You will always want to have the dev console enabled, so set this to yes. You can learn more about the console in our dedicated article. |
| Install Counter-Strike Workshop Tools | Set this to no unless you’re planning on developing maps, skins, or other content for the game. |
Best CS2 Resolution
One peculiarity in the professional Counter-Strike scene when you compare it to other pro shooter landscapes is the fact that a ton of different resolutions are being used by the pros. Some pros like to use a stretched resolution because it makes the character models appear wider, which in turn can make them seem easier to hit, for example. Other pros use lower resolutions for framerate reasons: less pixels to render means less stress on your GPU and PC, which in turn means a higher framerate count, and we all know that frames win games.
If you’re new to the game, we would just recommend you to go for whatever resolution your monitor is. Experimenting with other resolutions is definitely a valid option in this game though, so feel free to try out a couple and see what works for you. If you’re having difficulties reaching your desired framerates, you can also always consider lowering your resolution.
The vast majority of pros play on stretched resolutions, as you can see in the graph below.
Most Used Resolutions in Professional CS2
| Rank | Perc. | |
|---|---|---|
| 1 | 1280×960 | 53% |
| 2 | 1024×768 | 15% |
| 3 | 1920×1080 | 13% |
| 4 | 1280×1024 | 6% |
| 5 | 1152×864 | 5% |
Best Refresh Rate for CS2
If you want to be even a little bit competitive, you will need a monitor that’s capable of displaying at least 144 frames per second. The advantages of using high refresh rate monitors are so tremendous that they really cannot be ignored if you want to be the best player you can be.
This is all clearly explained in our detailed article, but it’s very simple: the higher the refresh rate of your monitor, the smoother your game will look and feel, and the lower your input latency will be. Investing in a high refresh rate monitor is thus a must for competitive gamers.
In CS:GO, the competitive standard for a monitor’s refresh rate has moved towards 360 frames per second, and while it’s true that there are diminishing returns with higher framerate steps, we would recommend at least a 240Hz monitor if you’re serious about playing at your highest potential.
Important: once you have a high refresh rate monitor, make sure you enable it in Windows. Do this by right clicking on your desktop, and then clicking ‘Display Settings’ -> ‘Advanced display settings’. Choose the correct refresh rate in that window.
Best Sensitivity for CS2
Quick tip: mouse sensitivity is the exact same in CS2 as it is in CS:GO, so you can just port your CS:GO sensitivity over to the game.
In order to compare your actual sensitivity with that of another Counter-Strike 2 player without having to account for different hardware settings, we use something that’s called eDPI. You can very easily calculate your own eDPI by multiplying your mouse’s DPI level (you can find this in the software or in your manual) with your ingame sens in CS2.
While we know that sensitivity is something personal, it’s also true that there are upper and lower limits. A ton of casual gamers have an eDPI that’s way higher than what the pros are using, and that will indisputably handicap you. Reddit user /u/JALbert had a fantastic explanation on this topic that we can’t resist sharing:
If you think about your opponent’s head hitbox as roughly a circle, that means there’s a corresponding circle of area on your mousepad you need to put the sensor on to have your crosshair on their head. The lower your sensitivity, the bigger the target area is for you to hit. It’s like making the basketball hoop bigger.
Since area for that head circle equals pi*r^2, cutting your sensitivity in half means that you’re doubling r, and in turn quadrupling the size of the target area on your mousepad. If you’re seeing that your eDPI is 5x the pros, you’re aiming for a spot 25x smaller.
Obviously going too low on sensitivity makes flicks slower and turning around more difficult, so there’s a balance. But lower sensitivity makes aim way more forgiving in terms of hitting a target.
-/u/JALbert
If you’re noticing that your eDPI is a whole lot higher than what the pros are using, you might want to consider lowering your eDPI.
Fun Facts
830
is the median eDPI of CS2 pros
47 cm
is the distance an average pro has to move their mouse to perform a 360 degree turn
Best DPI for CS2
There is absolutely no need to go for super high DPI counts. More does not equal better in this case. In fact, the vast majority of pros are using DPI levels of 3200 and lower, with 400, 800, and 1600 being the most commonly used DPI levels.
For more info, read our What is DPI & eDPI article.
Most Used DPI Levels in Pro CS
| Rank | Perc. | |
|---|---|---|
| 1 | 400 | 66% |
| 2 | 800 | 28% |
| 3 | 1600 | 5% |
Zoom Sensitivity Multiplier in CS2
The default setting here is 1, and a ton of players seem to stick with that, so we’d also recommend this.
This setting influences how fast you aim while using scoped rifles such as the Scout and AWP. It’s a good idea to play around with this setting even if you’re not a sniper, since there will be situations where you have to use a sniper in order to get yourself out of a tough spot: imagine picking up an enemy AWP after getting a cheeky frag on an eco round and not being able to work with it.
Mouse Hz
We’d recommend a polling rate of either 1000Hz or 4000Hz if you have a mouse that can go that high.
Your mouse’s polling rate (often called ‘report rate) determines how often your mouse sends its information (position counts, registered clicks, scrolls, …) to your PC. This is expressed in Hertz. Higher is mostly considered to be better here, but extremely high polling rates can cause stability issues in certain games and are more taxing on your system.
First Person Tracers
We recommend playing with First Person Tracers off.
Initially, this option wasn’t in the game, but after a lot of community feedback Valve has added the option to remove first person tracers. This setting can be found under Settings -> Game -> Item.
Due to the fact that the first person tracers currently don’t always align with where your bullets are going, it can mess up your sprays. This is why we recommend leaving it off.
Best CS2 Keyboard Binds
We recommend binding all of your utility (smoke grenade, flash grenade, …) to separate keys for easier access. You can also consider binding jump to either scrolling up or down. Everything else here mostly comes down to personal preference, so feel free to experiment with this.
Given the fact that CS2 has revamped their grenade system so that jump throws are now consistent and always reliable, there’s no need to create a jump throw bind.
Also read: Best Keyboard for CS2
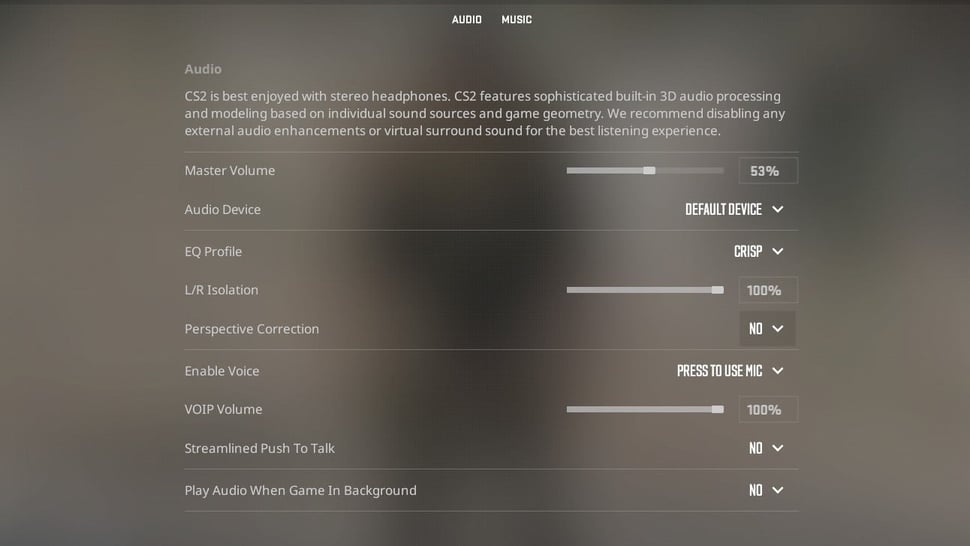
Best CS2 Audio Settings
You can and will win a ton of duels if your sound is dialed in, so investing in a proper audio solution and configuring it correctly (make sure to turn off all virtual surround sound processing features) makes a world of difference.
One quick tip here is to prioritize game volume. If you’re playing with a bunch of particularly chatty friends, consider turning down their volume, for example. Putting on music is also a big no-no when playing a competitive game.
| Master Volume | Set this to whatever is comfortable for you. Louder isn’t necessarily better; just make sure you can hear everything clearly. |
| Audio Device | Use Default Device or whatever audio device you wish to use for CS2. |
| EQ Profile | We use Crisp here, as it emphasizes the sounds in the higher registers, which are useful for the localization of enemies. If Crisp is too harsh on your ears, use Natural. |
| L/R Isolation | If you want a CS:GO style experience, where sounds are very clearly coming from a certain direction, use 100%. If you have gotten used to CS2‘s new sound system (which is more blended and more realistic, but can be worse for competitive performance for some) then use 0%. |
| Perspective Correction | If you want a more CS:GO style experience, use No here. This makes sounds a lot more ‘binary’ in the sense that they’re either coming from the left or the right. If you select Yes it’s a more natural experience. |
| Enable Voice | Use Press To Use Mic here. This way you’re only heard when you want to speak. |
| VOIP Volume | Use 100% here. |
| Streamline Push To Talk | If you experience stuttering while using push to talk, enable this. Otherwise you can leave it disabled. |
| Play Audio When Game In Background | This is entirely based on personal preferences, but we set it to No. |
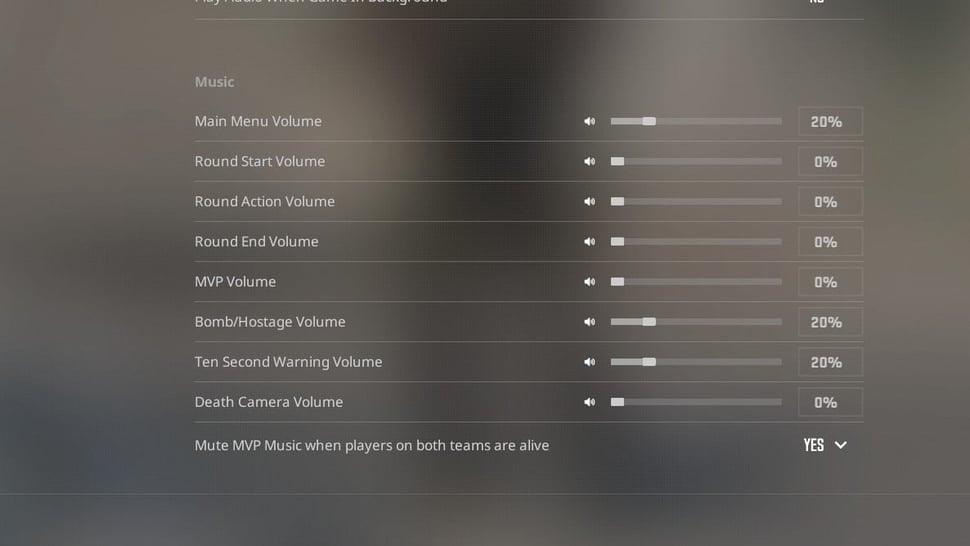
| Main Menu Volume | Set this to any percentage that’s comfortable for you. We don’t like to be blasted with noise when we open the game so we lower the volume a bit. |
| Round Start Volume | Set this to 0%, as it can distract you and mask important sounds such as footsteps or grenades landing. |
| Round Action Volume | Set this to 0% as it can be distracting. |
| Round End Volume | This setting has less of a tendency to cause distractions, but if you’re saving (for example) it can be crucially important to hear that hunting enemy approaching, so we recommend settings this to 0%. |
| MVP Volume | For the same reasons as above, we set this to 0%. If you like MVP sounds, you can enable this and use the Mute MVP Music When Players On Both Teams Are Alive option (listed below). |
| Bomb/Hostage Volume | Set this to 0%, as it can be distracting. |
| Ten Second Warning Volume | This used to be a ‘necessary’ setting because it gave you an indication when there were ~10 seconds left on the bomb but in October of 2023, Valve added a new, specific beeping sound for the bomb when there are ten seconds (or less) remaining on the bomb so you can now set this to 0%. It can still be handy to have this enabled (at a very low volume) for those times where you’re further away from the bomb or you can’t hear it beep, but it’s no longer required. |
| Death Camera Volume | Leave this at 0% as it can muffle important sounds such as where the player who killed you is heading. |
| Mute MVP Music When Players On Both Teams Are Alive | This mutes the MVP music if there are still players alive on both teams. This means that, in intense scenarios (where enemies might be hunting you) you won’t hear any MVP music, but you will hear MVP music if it’s safe (when one or both teams have all of their players eliminated). |
Best CS2 Radar Settings
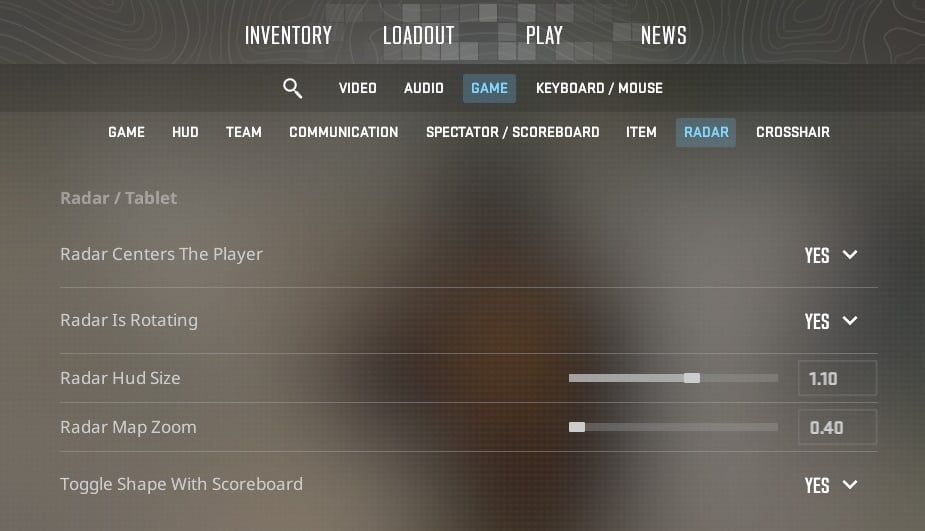
It’s a known fact that communication in online games isn’t always as precise and reliable as it should be, and a lot of those headaches can be rectified by zooming our your map.
In CS2, there’s a lot of important information that appears on the radar. You can see enemies that have been spotted by your teammates, the location of the bomb if it’s been spotted, and the exact spot where a teammate died. All of this can be round-winning info, and teammates aren’t always as capable with their callouts, so in the interest of having the best possible overview of the map and what’s going on in said map you will want to see most of it.
In short: zoom out your map, and maybe consider making it a bit bigger on your HUD as well. This will give you access to crucial information that you otherwise might not spot if you’re playing with the default radar.
What is the circle on the radar in CS2?
The circle around your position in CS2 indicates how far the sounds that you’re making (footsteps, shooting, …) can be heard on the map. This can be handy to decide when it’s time to start walking if you’re flanking or what not.
Best CS2 Crosshair Settings
The default crosshair in CS2 is a lot more usable than the one we had in CS:GO, so in essence there’s nothing wrong with using the default crosshair, but we find that most players will want to customize their crosshair either way. What you like really does depend on your personal preferences, but it’s important to make sure that your crosshair is visible on all backgrounds.
As a kind of ‘starting crosshair’ we found the following values to be a good point of entry:
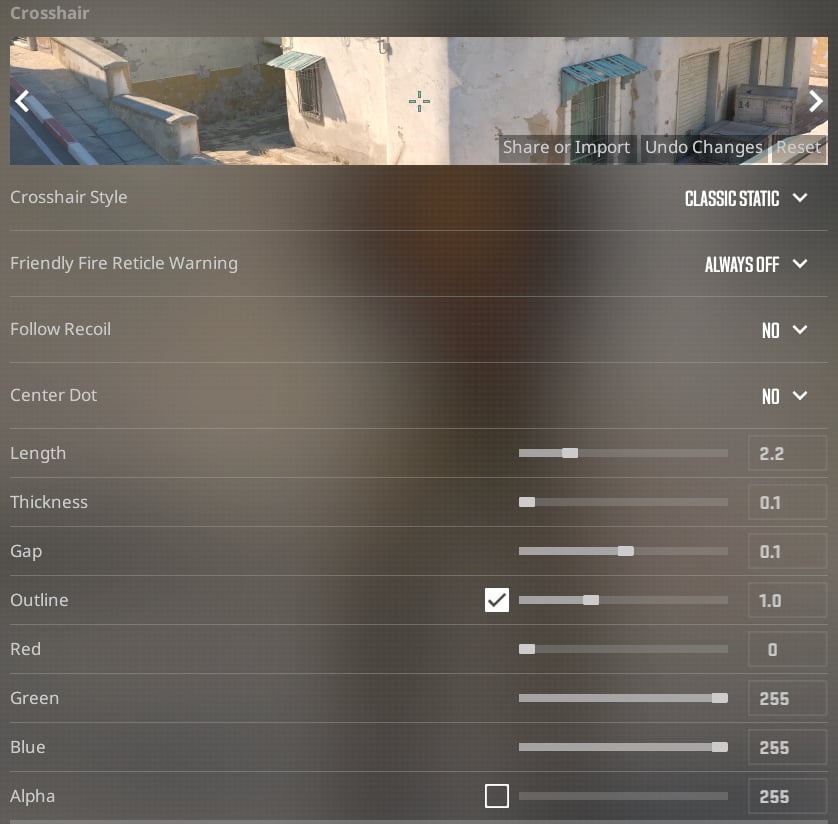
Follow Recoil
In CS2, there’s a new crosshair feature that’s called ‘Follow Recoil’. This basically means that your crosshair will follow the recoil compensation pattern of the gun: if you need to compensate to the left, for example, your crosshair will drift off to the left. In essence, this is a built in crosshair trainer.
If you’re new to the game and/or you’re mastering a new weapon, it can be a good idea to turn this feature on. Even experienced players might get something out of this, so feel free to experiment with this setting a little.
Best Settings and Options for CS2 – Conclusion
Valve have added a ton of QoL updates to CS2 (and who knows what’s still to come) so CS2 doesn’t require as much tinkering in order to get it to a playable state as its predecessor did, but it’s always a good idea to really get your settings configured correctly before heading out to climb the competitive ladder.
CS2 is of course freshly released, so none of what you see in this guide is set in stone. This guide is a work in progress and will be updated constantly in order to reflect changes to the game, so stay tuned if you want to get the heads up on what the best competitive settings for CS2 are.
If you’re looking for more resources, check out our other Counter-Strike 2 guides:
- HOW TO: Open Console in CS2
- CS2 Console Commands List
- What is ADR in CS2?
- How to Show FPS in CS2
- Will There be Overwatch in CS2?
- CS2 Guide for Beginners
- How to Transfer or Create a CS2 Config
What about Nvidia Control Panel (nvcp) and Windows 10/11 settings? What GPU driver’s are best for CS2? These things seem a little more important now with the introduction of CS2.
That’s certainly stuff we’re looking to add in the (near) future so stay on the lookout!