Introduction
Fortnite has been taking the world by storm ever since Epic released the Battle Royale mode of the game for free, and millions of players are jumping out of that bus every single day in order to get those precious wins and bragging rights. If you’re one of those players then you’ve come to the right place. Here, we’ll be detailing how you can get the best Fortnite settings in order to get the most out of your machine and yourself in order to optimize your chances of getting those Victory Royales. If you want a quick guide on some other, game-changing settings (that can be down to personal preference a bit more) you can also check out our other settings guide.
Best Fortnite Video Settings
If you’re purely about the competitive aspect, use performance mode.
Performance mode turns off unnecessary video settings that may cause fps drops or input lag. For most players, this setting will drastically improve their fps. However, if you have issues running the game in performance mode or you want to have a bit more graphical fidelity, then it’s a good idea to use either Directx 11 or Directx 12.
The difference between DirectX 11 and 12 is that DirectX 12 offers more options to improve the visuals of the game. These include Nanite meshes and Ray-tracing. These settings are purely for improving the graphics fidelity and can cause a major hit to your fps, so if you’re a purely competitive player we would not recommend turning these types of settings on.
| Setting Name | Setting Value | More Info |
|---|
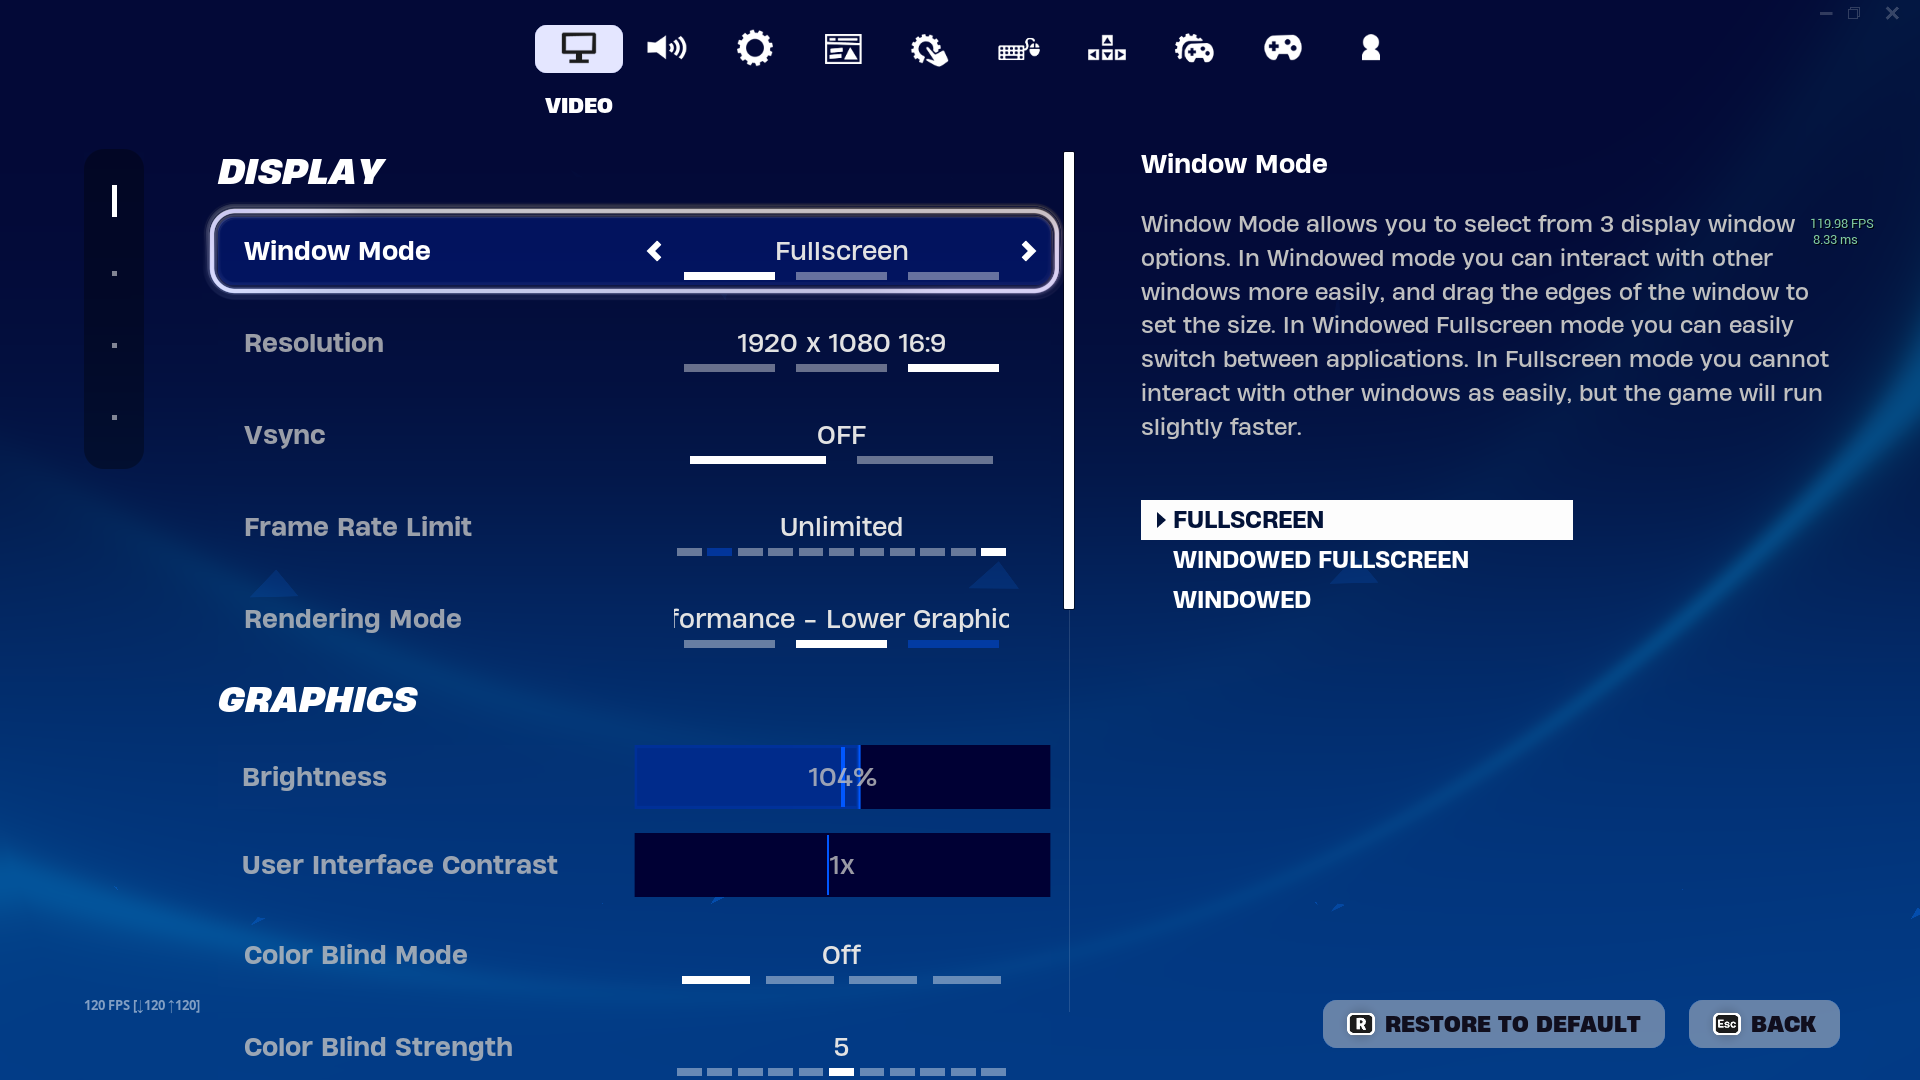
| Window Mode | Fullscreen | Using anything else can cause input lag. |
| Resolution | Set this to your monitor’s native resolution | N/A |
| VSync | Off | This causes input lag so you should leave it off. |
| Frame Rate Limit | Unlimited | If unlimited causes screen tearing or other issues, cap it at your monitor’s native refresh rate. |
| Rendering Mode | Performance | N/A |
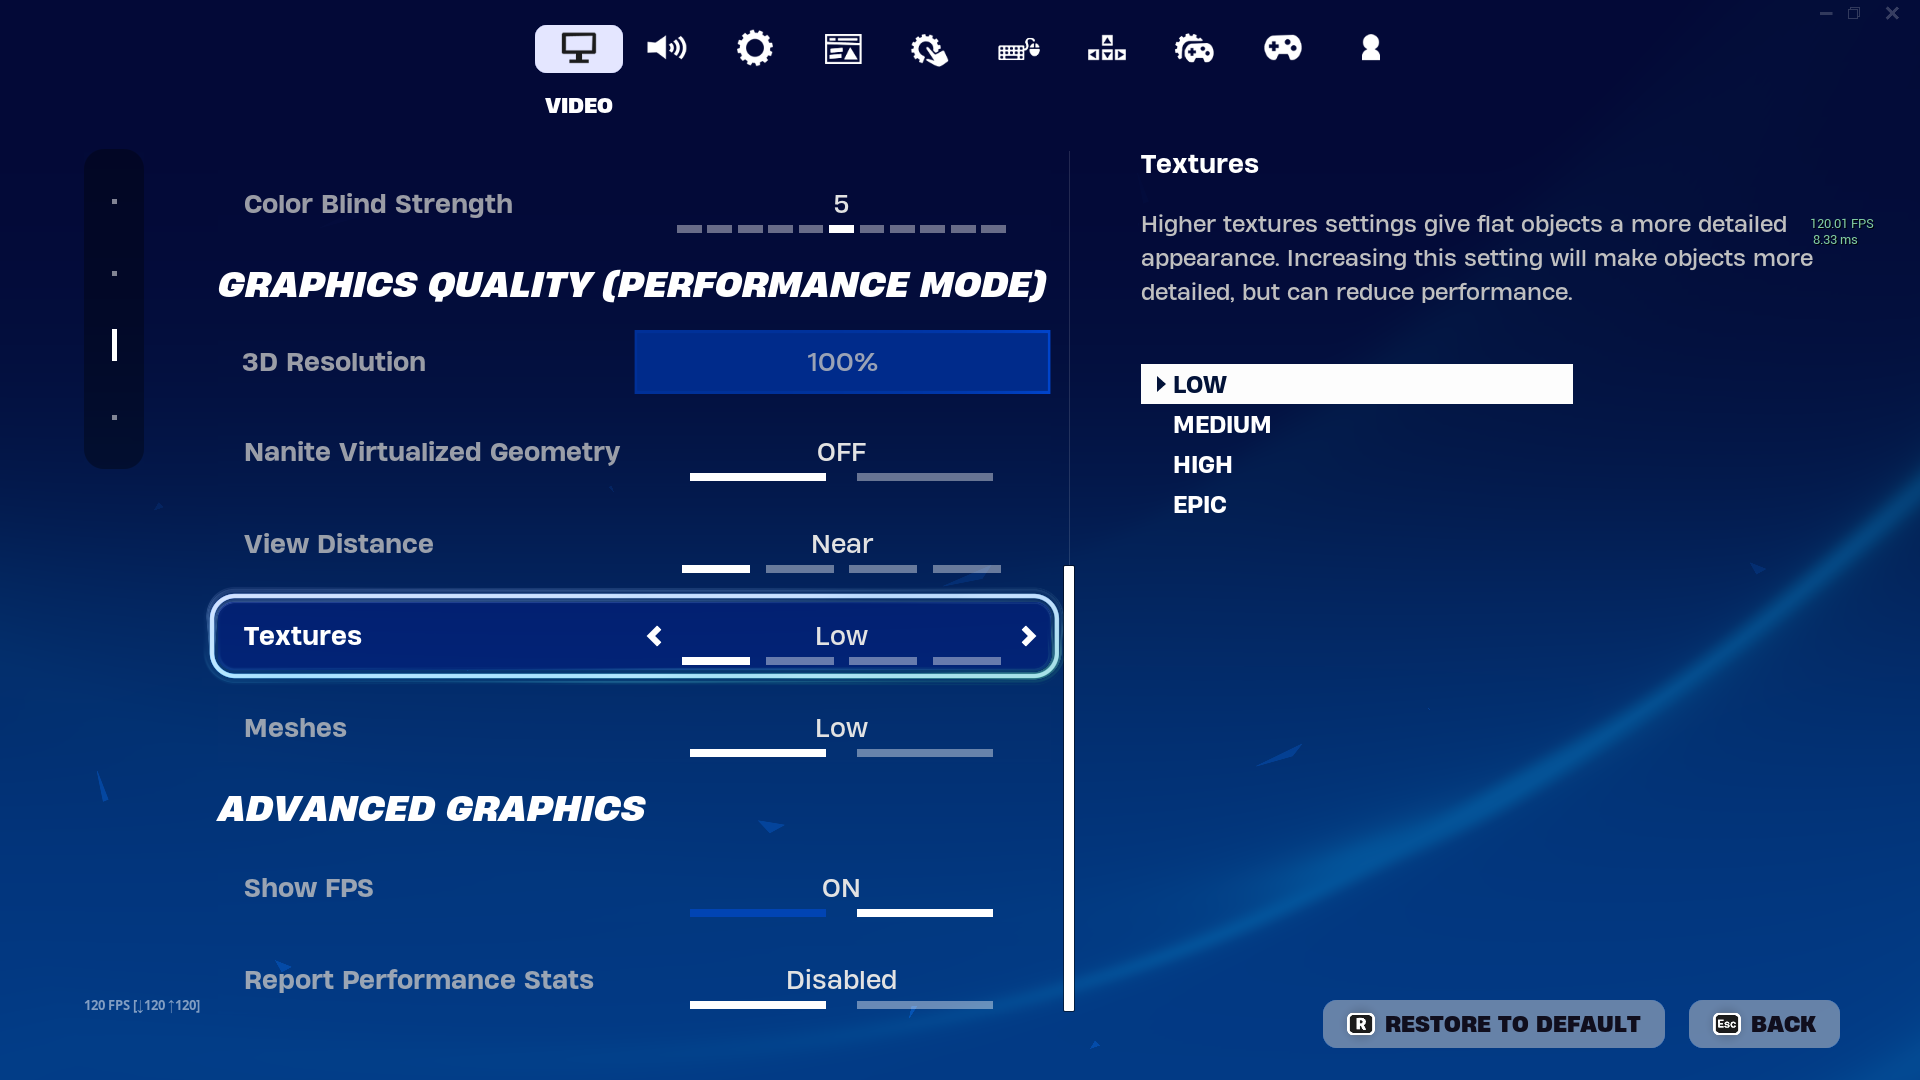
| 3D Resolution | 100% | If you are experiencing performance issues, you can set it to 80%. |
| View Distance | Near | This setting only affects the terrain (and not the players) so players still stand out even if you set this to the lowest setting. You can increase this if you’ve got some frames to spare since the pop-in effect of buildings and objects suddenly appearing on the horizon can get annoying and distracting. |
| Textures | Low | This is an eyecandy setting, so if you need the performance boost you can set this as low as you need it to be. |
| Meshes | Low | This is mostly a preference thing, though most pros have these on ‘Low’. You can try out different settings to see what works for you. |
| Show FPS | Enabled | Enable this, as it’ll allow you to see when your machine is struggling to get frames during gameplay. |
| Report Performance Stats | Disabled | Disable this, as it doesn’t do anything useful for you in the actual game. |
Best Fortnite Settings – Other Modes
| Setting Name | Setting Value | More Info |
|---|
| Window Mode | Fullscreen | Using anything else can cause input lag. |
| Resolution | Set this to your monitor’s native resolution | |
| VSync | Off | This causes input lag so you should leave it off. |
| Frame Rate Limit | Unlimited | If unlimited causes screen tearing or other issues, cap it at your monitor’s native refresh rate. |
| Rendering Mode | DirectX 12 or DirectX 11 | If you’re playing competitively, we recommend performance mode (above). If you want some eye candy to be involved, you can use DirectX 12 or DirectX 11 if you’re not too low on frames. |
| Auto-set and Quality Presets | N/A | You don’t need to touch this, they will automatically change when you change your settings. |
| Antialiasing and Super Resolution | Off | Turn this off for maximum performance. However, if you are experiencing shimmering and sharp edges in your graphics, try using FXAA or TAA. |
| Temporal Super Resolution | 50% | This setting will be only available if you turn TSR on in Anti-Aliasing and Super Resolution. We recommend going for 50% here if you use TSR. |
| 3D Resolution | 100% | Set this to 100%. You can lower it down to 80% if you are experiencing performance issues. |
| Dynamic 3D Resolution | Off | We recommend leaving this off, as it’ll make the performance of the game more inconsistent. |
| Nanite Virtualized Geometry | Off | Leave this off. It makes the game look prettier, but it comes at a big performance cost. |
| Shadows | Off | Turning this off will increase your PC’s performance while leaving it on gives you no real advantages, so leave this off. |
| Global Illumination | Off | Turn this off for the best performance. Turning it on will improve the ambient lighting in your game but will reduce performance. |
| Reflections | Off | This is purely eye candy. |
| View Distance | Near | This setting only affects the terrain (and not the players) so players still stand out even if you set this to the lowest setting. You can increase this if you’ve got some frames to spare since the pop-in effect of buildings and objects suddenly appearing on the horizon can get annoying and distracting. |
| Textures | Low | This is an eyecandy setting, so if you need the performance boost you can set this as low as you need it to be. |
| Effects | Low | The more detailed the effects are, the higher the risk you run of getting unstable framerates during fights. |
| Post Processing | Low | Set this to low. This actually makes the game less blurry, since turning this up too high causes a blur when looking at long ranges, putting you at an obvious disadvantage. |
| Motion Blur | Low | This effect is used to make games look more ‘cinematic’ by blurring the screen during fast movements. This hinders visibility and performance. You probably shouldn’t ever turn this on in any competitive game. |
| Hardware Ray Tracing | Off | Ray Tracing is cool technology, but it’s not useful in competitive settings rights now and it uses a ton of resources, so leave this off. |
| Use CPU Crash Debugging | Off | Turn this off to avoid performance issues. |
| Latency Markers and Report Performance Stats | Off | Turn both these settings off. |
| NVIDIA Reflex Low Latency | On + Boost | We recommend setting this to On + Boost as it’ll lower your overall system latency. |
Best Resolution and Refresh Rate in Fortnite
Almost all Fortnite pros are on 1920×1080. There’s a few playing at 1440p resolution, but that is in no way necessary and you’ll need a pretty beastly rig to run the game properly at that resolution. There are some pros who are playing with custom resolutions, but those are more the exception than the norm as you can see in the statistics.
If your PC can run the game (and at least reach your monitor’s native FPS) well enough, feel free to turn the resolution up but since frames are way more important for performance than pretty effects we do encourage everyone to stay at resolution that their PC can handle.
Fun Facts
~ 73
%
of Fortnite pros use a 240Hz monitor
~ 80
%
of Fortnite pros play using a 1920×1080 resolution
Best Mouse Settings for Fortnite
After you’ve picked out a mouse to your liking (see our best mouse for Fortnite guide) you need to make sure that you didn’t buy it for naught. A lot of gaming mice like to advertise that they can reach DPI settings higher than you can count, for example, but that’s really not that useful. The vast majority of our analyzed professionals use a DPI that’s lower than 3200.
Fortnite is a game that has a bunch of different sensitivity sliders, so it’s not easy to compare one pro’s true sensitivity to that of another. One player might prefer a rather low overall sensitivity with a very high scope sensitivity, for example, while another player might go for just the opposite of that. These different sensitivity parameters, combined with the fact that the mouse DPI obviously also plays a role in the overall sensitivity of a player makes it practically impossible to slap one number on it and say ‘that’s the sensitivity that that person is using’. We also have a general guide on how to find your personal best sensitivity for gaming.
Best Controller Settings for Fortnite
Seeing as Fortnite has a vast amount of different controller settings to configure, we have a dedicated article on the best controller settings for Fortnite. If you’re a controller player, we definitely recommend you to check it out, as it’ll give you an ideal starting point to build your own controller settings.
Sensitivity in Fortnite
A lot of pros tend to favor the consistent feeling of having their X and Y sensitivity set to the exact same value, but if you are an old school player (pre-summer 2018) and you liked Fortnite’s previous way of doing sensitivities, you can always ‘go back’ to those by just having your Y sens be 70% of your X sens. This is how it used to work pre-2018.
Some pros like having their y sensitivity at a lower value to make it easier to track enemies horizontally, so there isn’t necessarily one best option here.
In general, you don’t want your sensitivity to be too high. If your sensitivity is too high it means that you won’t be able to do the necessary micro adjustments in order to successfully hit targets at a distance, for example. The reverse is of course also true: have it too low and you’ll be one pumped long before you’ve made the required five swipes over your mouse pad in order to turn around.
In short: make sure that you can look around quickly and smoothly, but do take care that you can also aim precisely if you have to.
| Rank |
|
Perc. |
| 1 |
7.00%-9.00%
|
30% |
| 2 |
2.50%-6.90%
|
27% |
| 3 |
9.10-12.0%
|
21% |
Targeting Sensitivity in Fortnite
Your ADS (Aim Down Sights) sensitivity is going to be your primary sensitivity for medium to long range duels, so it makes sense to have this one set to something which allows you to aim properly without any jitters. If your regular sensitivity already allows you to do this then great; keep your ADS sensitivity at roughly the same as your normal sens. If you have your regular sens set to be a bit higher than what you’re normally comfortable with for aiming then you should consider lowering your ADS sensitivity.
There is something to be said for having both settings be the same (so that it’s easier to develop the muscle memory for quick flicks etc.) but a lot of pros go for values that are somewhere around the 50% mark. This could be because of what we mentioned before: having a higher looking sensitivity is good for quickly scanning your surrounding and shooting enemies that are close to you, and once you need to really start aiming it can be a good idea to have a lower sensitivity so you can aim in a more precise manner.
| Rank |
|
Perc. |
| 1 |
100%
|
18% |
| 2 |
50%
|
17% |
| 3 |
40-49.90%
|
14% |
Scope Sensitivity in Fortnite
Scope sens uses practically the same theory as the ADS sensitivity setting. You’ll want to make sure that you’re able to accurately hit that one pixel of your enemy that’s showing, so make sure to set it so that one little breeze against your mouse doesn’t make your scope flick towards the other side of the map.
Here it’s important (again) to prioritize consistency over speed. When you’re looking through a scope for an extended period of time you’re more than likely not going to be in a heated close quarters match, so it doesn’t make sense to have this setting be too high. Make sure that you’re able to hit what you want to hit and minimize the odds of you missing an easy shot. You can do that by not going overboard on the sensitivity. If your default sensitivity is on the higher side you can definitely opt to go for a lower scope sensitivity to balance it out.
| Rank |
|
Perc. |
| 1 |
100%
|
21% |
| 2 |
50%
|
17% |
| 3 |
40-49.9%
|
15% |
Best Fortnite Keybinds
Building is a very important part of Fortnite, so it’s no real surprise that being able to build quickly and efficiently can give you a massive advantage over your opponents. The default keys for building in Fortnite can be quite awkward to reach, especially when you’re in the heat of battle. For this reason, most professionals use custom keybinds for building. We recommend that you do the same, unless you’re super comfortable with the default keys already.
Which keys you use is obviously personal preference, but generally you’ll want to make sure that you’re able to reach the most important ‘building elements’ comfortable each time. E, Q, and the mouse side buttons are often used for buy binds in the pro scene, and don’t forget that you can also bind your scroll wheel to ingame actions.
Best Fortnite Audio Options
We have an in-depth article (Best Audio Settings for Fortnite) on Fortnite audio settings, but if you just want to use the optimal settings in order to get started, you can use the following settings as an ideal starting point:
| Main Volume | 100% |
| Music Volume | 0% – 20% |
| Sound Effects | 100% |
| Dialogue | 0% – 20% |
| Voice Chat | 10% – 80% |
| Cinematics | 0% – 20% |
| Sound Quality | High |
| 3D Headphones | On (turn off any virtual surround sound tech that comes with your audio devices) |
| Background Audio | Personal preference |
| Visualize Sound Effects | On |
Conclusion
Fortnite isn’t the craziest game when it comes to customization options. People generally don’t spend days talking about what resolution is the perfect one or anything like that like they do in games like CS2. That’s partially because the game is optimized pretty nicely and partially because you can’t really customize your radar, HUD, … as you can in certain other games, so there’s just less to discuss.
A few settings are ‘mandatory’ for optimal performance (as highlighted above) so if you just follow these guidelines, make sure you’re getting enough FPS, and that your sens isn’t something outlandish you’ll be jumping out of that Battle Bus prepared like a pro. Remember that some settings (such as sensitivity) are highly personal, so what works for a certain pro might not work for you. It’s important to develop your own habits and settings in order to make sure you’re as comfortable as possible when playing.
Hopefully this guide has helped you a bit, but please do let us know if you have any questions or remarks.