How to Transfer or Create a CS2 Config

The settings menu in CS2 is big and extensive, but that doesn’t mean that there aren’t any console settings (HOW TO: Open Console in CS2) that you might want to tweak via a CS2 config. In this article, we’ll show you how to create a CS2 config or, if you already have a CS:GO config (see How To Use a CS:GO Config and Create an Autoexec) we’ll show you how to transfer your CS:GO config to CS2.
What is a CS2 Config?
A config file is a file that you place in the relevant location of the game’s files. This file will automatically run the commands that you’ve placed into it (such as HUD parameters, key bindings, …) every time you run the game. Using a CS2 config allows you to have a file that has all of your personal settings in it so that the game runs and plays exactly like you want it to, no matter where you’re booting the game.
This is mostly handy for players who are often playing on different machines, but we’d recommend everyone to have their own config, even if you’re always playing at home. Games can sometimes reset settings after updates, for example, and by using a config you’ll be sure that the game is doing exactly what you want it to do.
Pro tip
A config file is basically just a text file. Once you create your own config, it’s a good idea to store it somewhere online where you always have access to it. This way you always have access to your config.
How to transfer a CS:GO config to CS2
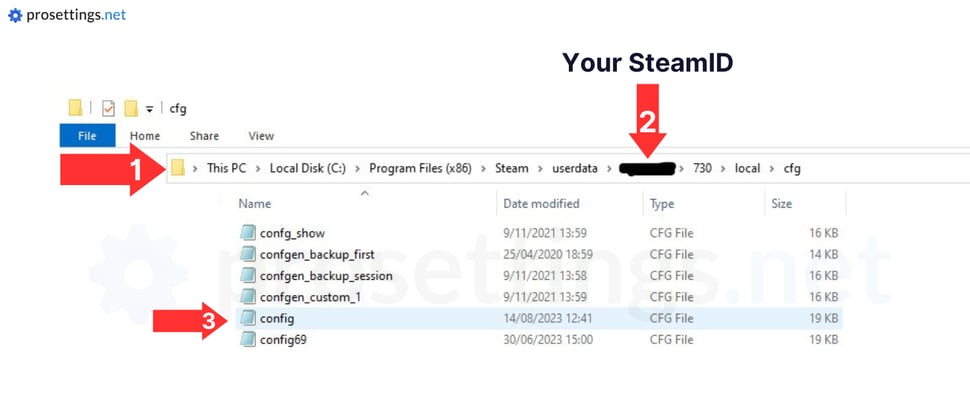
If you already have a CS:GO config you can transfer it to CS2. First, you’ll need to locate your CS:GO config. This can be found in your Steam folder, which is usually in ‘Local Disk (C:)’.
Once there, navigate to ‘Program Files (x86)‘ -> ‘Steam‘ -> ‘userdata‘ -> YOURSTEAMID (this is a bunch of numbers that corresponds with your personal Steam ID number) -> ‘730‘ -> ‘local‘ -> ‘cfg‘.
Now it’s simply a matter of locating your config file and copying it (right click -> ‘Copy‘) and you’re ready for the next step.

How to install a config in CS2
For now, the CS2 configs are located in your Steam folder (which usually is in ‘Local Disk (C:)’) under Global Offensive’s files. The CS2 config should be placed under ‘Steam’ -> ‘steamapps’ -> ‘common’ -> ‘Counter-Strike: Global Offensive‘ -> ‘game’ -> ‘csgo’ -> ‘cfg’.
Once you’re in this location, quite simply paste your CS2 config (by right clicking in a location that’s not a file and pressing ‘Paste’) and you’re done!

WARNING
Not all CS:GO commands and options are the same in CS2, so some of your CS:GO config lines might not work (yet) in CS2. If you have a very elaborate config, you might want to double check some commands.
How to create a CS2 Config
Creating a config is a relatively straightforward process. A config file is basically a text file that has a bunch of console commands in there. You can check out our CS2 Console Commands List to get started with your config.
How to activate a CS2 Config
Simply launch CS2, open the console (HOW TO: Open Console in CS2) and then type exec config.cfg. This activates your config.


unfortunately in my version when I export my configuration using host_writeconfig the result comes in several separate .vcfg files and not in the traditional format accumulated in a single file.
Do you know how I can generate everything in a single file or do you know if there is a way to convert them all into just one .cfg?
Thanks
yes, I have same issue. If you fix that, could you please share it?