How to use a CS:GO config & create an autoexec

CS:GO is a game that offers a lot of customization options. Players are constantly experimenting with their resolution, crosshairs, video settings, and so on. A lot of these finer adjustments are made in the console of the game (which you can access by pressing the ~ key by default) but the annoying thing is that they often reset upon rebooting the game. It can be a massive annoyance to have to retype all of your special settings each time you reset the game, so for that reason players have taken to using an autoexec.
An autoexec is basically a personal config file that you put in the game’s files with your own personal settings (such as crosshair settings, buy binds, sensitivy, and so on) so that the game automatically loads these settings each time you start up the game. That’s really handy in and of itself, but the cool thing is that this allows you to instantly load up your own settings anywhere. Just store your own autoexec file somewhere you can access it online and insert it into the game if you’re playing on a different PC at a LAN or whatever and voila! You’re playing on your own trusty settings.
In our step-by-step guide below you’ll learn how to import configs and create your own autoexec.
PRO TIP
If you make your own personal config/autoexec file, remember to store it somewhere online in case it gets replaced or removed in the game’s files.
How to use a CS:GO pro’s config
- Download the config of the player that you want.
- Open the zipped file with your preferred program.
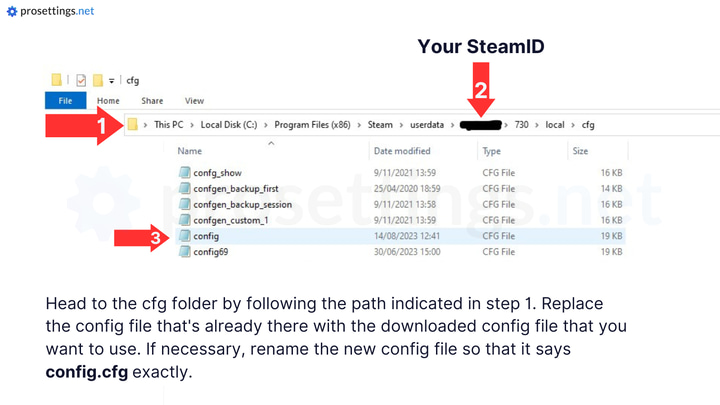
- Go to your Steam folder (this is usually in ‘Local Disk (C:)‘) and then navigate to ‘Program Files (x86)‘ -> ‘Steam‘ -> ‘userdata‘ -> YOURSTEAMID (this is a bunch of numbers that corresponds with your personal Steam ID number) -> ‘730‘ -> ‘local‘ -> ‘cfg‘.
- Place your old config.cfg file in your backup folder.
- Place the downloaded config in the cfg map. If it is not already named ‘config.cfg’ you should right click it and rename it so it says exactly ‘config.cfg‘.

PRO TIPS
If you don’t know your SteamID, you can find out yourself using the instructions provided by Steam.
Create a backup folder of your own config for safekeeping. Save it somewhere that’s easy to find such as the desktop or an online file hosting service.
All you need to use a pro player’s config is a downloadable file of their config file. We’ve got the configs of a whole bunch of professional CS:GO players ready to download, so if you want to use (for example) s1mple’s settings, just go to his s1mple’s player page and click ‘config’ and your download should begin automatically.
To get back to your own config just remove the downloaded config and replace it with the config file you placed in the backup folder.
Popular pro configs
- s1mple CS:GO config
- NiKo CS:GO config
- m0nesy CS:GO config
- Twistzz CS:GO config
- ropz CS:GO config
- cadiaN CS:GO config
- HooXi CS:GO config
- NAF CS:GO config
- Brollan CS:GO config
- Jame CS:GO config
Clicking the links above will immediately start a download of a config file.
How to create an autoexec and use it
Creating an autoexec is actually really simple if you just follow the right steps. First, we recommend that you download Notepad++ so that you can easily edit your file once you’ve created it. This is a perfectly safe program that’s used by millions of people around the world, so there’s no need to worry about this at all. With Notepad++ downloaded (it’s a very small program, so it shouldn’t take long at all) you’re all set to go.
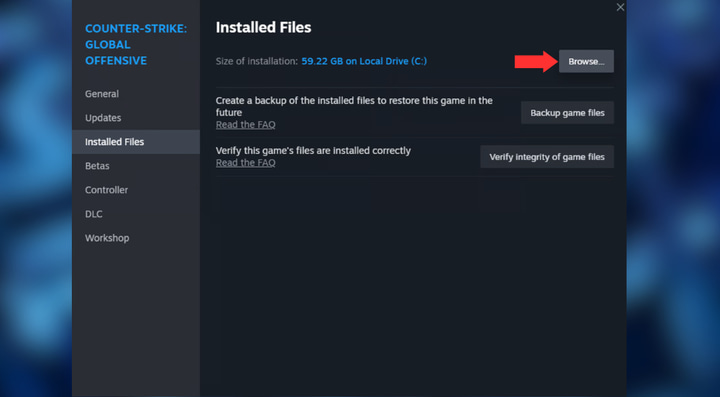
1. Go to your CS:GO config folder. To find this, go to your Steam library and right click on Counter-Strike: Global Offensive. Then click on ‘Properties‘ and after that click ‘Installed Files‘ and then click on ‘Browse‘.

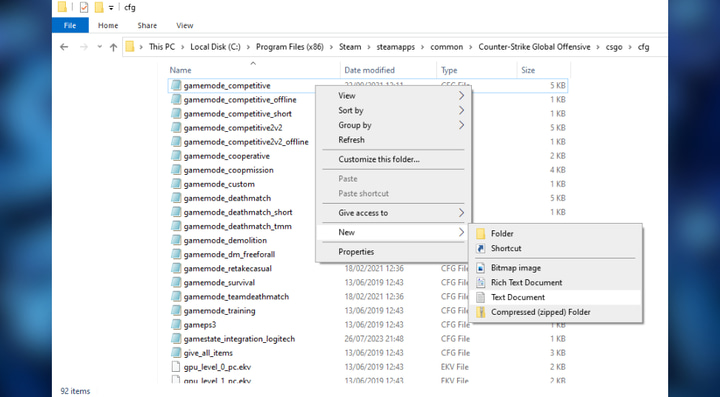
2. You’ll get to a map with lots of folders in it. Double click on ‘csgo‘, then go to ‘cfg‘. You’ll see a long list of files and documents, but don’t worry about that.
3. Right click somewhere that’s not a file and click ‘New‘ -> ‘Text Document‘. You should name this ‘autoexec.txt‘ when you make it.

3. Open your brand new autoexec.txt file and write your favorite commands. What you use will be dependent on what you personally want. If you are unfamiliar with the CS:GO console and/or you want to see how various config commands change your game experience, you can use the config generator by crashz & Misterio to test out the various settings. This CS:GO Workshop Map will then give you a text file to put into your autoexec once you’re done, though you can also use online config generators or simply paste the console commands yourself.
4. Important: write ‘host_writeconfig‘ at the last line. Most config generators already do this, but it’s important to double check. Once you’re all done writing/pasting your autoexec lines, press ‘File‘ -> ‘Save As‘. You now need to name the file ‘autoexec.cfg‘ (it’s really important that you check your spelling) and save it as ‘All Files‘.
5. Your autoexec is now ready. You’ll find that your old .txt file is still there, but you can delete that if you want since you can directly edit your autoexec using Notepad++ by right clicking and clicking ‘Edit with Notepad++’.
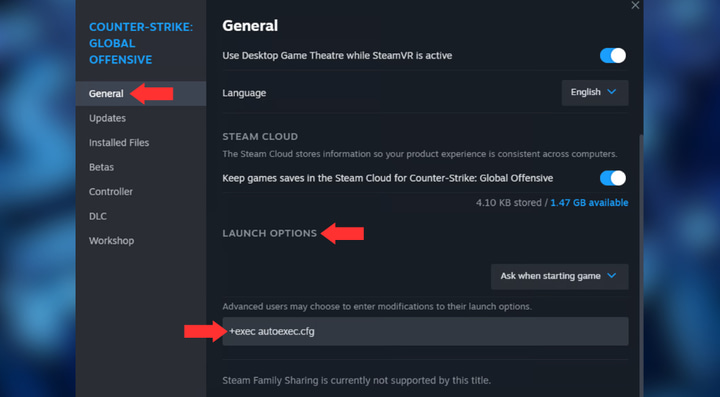
Now your autoexec needs to launch every time you launch the game, so navigate to your Steam library again.
- Right click ‘Counter-Strike: Global Offensive’.
- Click ‘Properties’.
- Navigate to ‘General‘.
- Scroll down to ‘Launch Options‘.
- Write ‘+exec autoexec.cfg’ and then press ‘ENTER’.

You’re all set!


when i change some settings how to save them becz when i relunch the game it changes back
do you have to put quotes on the commands or is an enter command enough?
No need for quotes!
how i found my steam id
We added a section to the guide to help you with that, but Steam has a guide on it linked here: https://help.steampowered.com/en/faqs/view/2816-BE67-5B69-0FEC
the cfg wont load when i did all the steps i must be confused but if there is a way to fix it plz let me know if i find a way ill let you know
open the console and type exec config to use the new
For step #4, do you need quotations?
Nope, no quotations!
finally workedddddd. Other videos I was watching never told me to make the text document into a cfg document by changing the name to cfg.
Glad it helped! It can be a confusing process indeed!
what do you mean by cfg map
I do not have notepad ++, where can I download it, and how can I separate the commands I want to be executed on startup?
https://github.com/notepad-plus-plus/notepad-plus-plus/releases/download/v7.9.5/npp.7.9.5.Installer.exe
“Go to your Steam folder (this is usually in ‘Local Disk (C:)‘) and then navigate to ‘Program Files (x86)‘ -> ‘Steam‘ -> ‘userdata‘ -> YOURSTEAMID (this is a bunch of numbers that corresponds with your personal Steam ID number) -> ‘730‘ -> ‘local‘ -> ‘cfg‘.”
When I reach userdata I see 7 folders with random numbers.
I checked all of them and I have a few with “730” name(so not just one).
Should I replace both?
That’s strange. Have you tried verifying the integrity of your game files through Steam and are you sure you’re in the right folder?
To find which is which login to whichever account you would like to use and check the steam friend code. The number on the userdata is the same as the friend code.
That means you have multiple steam account because the numbers replicate your steam id
Hey! Whats the difference between config.cfg and autoexec.cfg ? I have everything including binds and scripts in one autoexec.cfg since cs 1.6?
The config holds your client settings and can be overwritten by the client while the autoexec holds custom binds and so on and cannot be overwritten by the client. The difference is a bit blurred and both are used interchangeably by people online but you’re good to go with your autoexec.
I started few weeks ago with csgo and i‘m looking forward to okay ranked/ faceit and i came around nade jumpthrow binds. It got me kinda confused with the autoexec until i read this article! Thank you very much!
Hey, configuring all of your CS:GO stuff can be confusing if you’re new to the game so glad we could be of help!
thats great. i love this way. its simple and easy !!!
Glad that you like it!