Introduction
With VALORANT winning multiple game of the year awards at the Esports Awards it’s undeniable that Riot’s shooter has become esports royalty. With 128-tick servers, a robust anti-cheat system, an engine optimized to run well even on low tier systems and of course the support of Riot games, this free to play tactical FPS has drawn the attention of tons of gamers, and it’s not showing any signs of slowing down. If you want to be the best you can be and stand out among hundreds of thousands of players, you’re going to need to use the best VALORANT settings.
If you want to get right into it with the optimal combination of VALORANT settings then you’ve come to the right place. Our in-depth settings guide is based on our own testing, pro preferences, and benchmarks. This is a perfect starting point to start creating your own settings profile.
Best Video Settings for VALORANT
The performance of a game can fluctuate between patches, even in games that have been out for years, but lately VALORANT seems to be pretty stable on this front. Riot have definitely delivered on the performance front: the game is pretty easy to run and getting high framerates doesn’t require you to have a beast of a PC.
As with any competitive game, it’s incredibly important to maximize your framerate to get the smoothest game possible. Having a higher framerate gives you plenty of advantages so we definitely recommend an upgraded panel if you’re serious about any competitive shooter game like VALORANT. For this reason, we’re not interesting in maxing out the settings: we’re interested in the best blend between performance and visibility.
If you’re currently on a subpar build and you’re interested in a new VALORANT PC, you can check out our Best PC for VALORANT guide.
Quick tip: some pros like to use different highlight colors for enemy players. Yellow – Deuteranopia seems to be the most common and it’s a highlight color we recommend trying out as well; it can really make the enemies stand out a lot more for some. If it doesn’t really help you then you can always switch back.
In patch 1.10 a new graphical setting called Experimental Sharpening was added. A Riot employee confirmed that they put it in there by accident and that it’d be removed by the next patch but after a lot of requests to keep it in Riot has now left it in in ‘beta mode’. We suggest experimenting with this yourself to see if you like it. Once the setting is out of beta we’ll add it to our list below.
| Resolution | Set this to your monitor’s native resolution and refresh rate. |
| Display Mode | Set this to fullscreen to maximize your frames per second. |
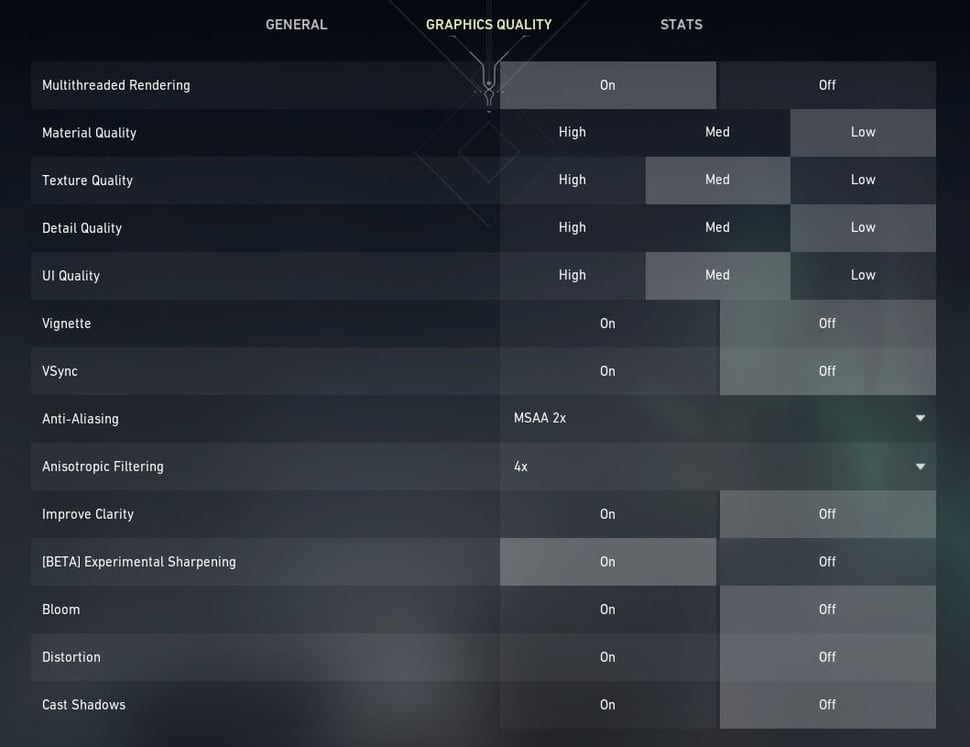
| Material Quality | This setting has a relatively high impact on the overall performance of your PC. It handles relatively unimportant (for competitive gaming, anyway) aspects such as the complexity of shadows and materials, so in the interest of saving frames we recommend setting this to low. |
| Texture Quality | This has a low impact on your performance, and on high tier systems the different settings don’t even seem to make any impact whatsoever. We recommend setting this to medium or high unless you absolutely need the frames if you’re on a lower tier system. |
| Detail Quality | This impacts foliage, tree leaves, and so on. This has a relatively high impact on your system, and it can also add visual clutter. On high, for example, vines might appear on a wall that’s otherwise mostly blank or consisting of one texture, so you might even gain a slight competitive advantage by setting this to low. As such we recommend going for low. |
| UI Quality | This setting affects how the UI (player portraits, the settings menu, …) impacts the visual environment of the game. This doesn’t have a big impact on performance or visuals so we tend to leave it at medium. |
| Vignette | Vignette in games just adds a darker/less saturated area around the edges of your screen in order to make the game look a bit more cinematic. We recommend turning this off as it can reduce visual clarity and doesn’t offer any advantages when turned on, unless you prefer the more ‘focused’ feeling of having vignette on. |
| V-Sync | We recommend turning this off unless you’ve got absolutely unbearable screen tearing since V-Sync can cause input lag. |
| Anti-Aliasing | We recommend setting this to MSAA x2. This setting will prevent blurry edges and make edges clearer to see while also not being too taxing on your system. |
| Anisotropic Filtering | This influences the sharpness of surfaces that are at oblique angles. This normally doesn’t give a huge difference in clarity so we recommend to experiment with it a bit and see what you like; we found 2x or 4x to be good here. |
| Improve Clarity | After doing a lot of testing and research this setting seems to basically just affect your contrast/the dynamic range of the lighting, making lighter areas a bit lighter while also making darker areas a bit darker. A good chunk of professionals leave this on but on some systems it can eat away at performance, and since the visual gain is so small you should leave this off if you find that it affects your framerates. |
| Experimental Sharpening | This sharpens the edges of textures for increased visibility. This is still in beta so we can’t give a firm answer here, but on our testing rig we prefer to leave this setting to ‘on’, though feel free to experiment with this. |
| Bloom | This setting was initially called ‘First Person Enhanced Visuals’ but was renamed to ‘Bloom’ as it affects more than just first-person visuals. It’s a visual bloom/glow effect that mainly affects weapon renders. It’s best to turn this off since it offers no competitive advantage at all and is basically just an eye candy setting. |
| Distortion | Set this to ‘off’. Anything that reduces visual clarity by introducing aspects such as distortion should be avoided. |
| Cast Shadows | This only affects the shadows that are cast on your own player model/view model, so turn this off as it offers no competitive advantages. This setting has nothing to do with shadows that are cast by enemies or what have you, so it’s not necessary to turn this on. |
NVIDIA Reflex Low Latency Technology
Reducing the overall system latency of your game is of critical importance if you want to perform at any kind of competitive level in games like VALORANT. It’s for that reason that professionals prefer frame rates over visuals (the higher the frame rate, the lower the overall system latency) and in that light NVIDIA has also released their Reflex Low Latency Technology. Since NVIDIA is the de facto ‘standard GPU supplier’ for the professional Valorant scene we though it would be useful to include a small section on the tech, doubly so because it’s available on all modern NVIDIA GPUs (as long as you have a GeForce 900 series card or older you’re good).
The Low Latency Technology works in two ways: it allows you to measure your overall system latency (though you need compatible peripherals for that) and it allows developers to reduce the overall system latency by keeping the GPU and CPU in sync with each other, thus reducing the render queue. In short: NVIDIA Reflex reduces your overall system latency (and the Latency Analyzer allows you to identify potential bottlenecks, for example) and that’s always a plus if you’re a gamer. You can read NVIDIA’s detailed explanation here if you’re interested, or you can check out our more surface-level explanation here.
Best Mouse Settings for VALORANT
VALORANT is a shooter with a low time to kill (TTK) which means that precision will be rewarded thoroughly; you can’t afford to miss half of your shots if you can get killed by one Vandal bullet. For that reason is’t important to choose a sensitivity setting that allows you to aim precisely (read: an eDPI that’s not too high) while also giving you the ability to quickly react to flanks or enemies who show up in unexpected positions.
The average eDPI (DPI*sens) sits at 267 at this point in time, meaning that the average pro has to move his mouse ~45 centimeters to do a 360 degree turn in the game. This doesn’t mean that you have to do the exact same, but if can give you an idea of the kind of sensitivity that these pros are using. We have a complete guide on how to find your own personal best sensitivity in case you’re interested.
As far as your scoped sensitivity multiplier goes we’d recommend setting yours to ‘1’ as that means that your scoped sensitivity matches your ADS sensitivity which is better for consistency’s sake. Most pros opt for this setting as well, with a couple trying a lower setting to get that more precise feeling with scoped weapons. The average scoped sensitivity setting sits at 0.97 right now.
Another important thing to note is that pretty much no pro VALORANT player uses a DPI that’s higher than 1600. Around half of all players are on 800 DPI, while around 40% are using 400 DPI.
Little tip: if you’re coming from CS:GO (or any other game that we analyze, for that matter) and you want to use the exact same sensitivity in this game you can always use our calculator!
Fun Facts
45 cm
is the average cm/360 in professional VALORANT
240
is the median eDPI of VALORANT pros
79 %
of VALORANT pros use a scoped sens of 1.00
Best Minimap Settings for VALORANT
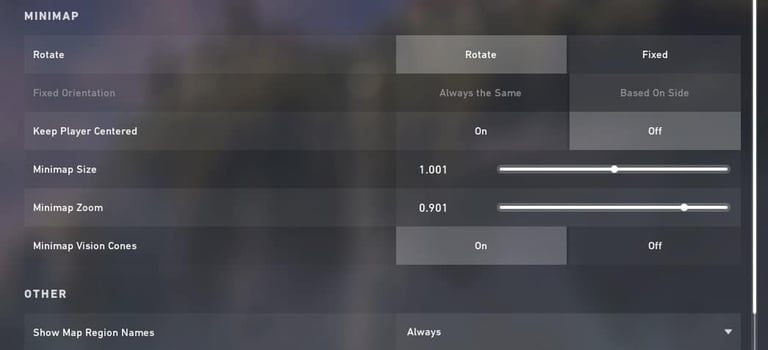
What kind of minimap settings you go for largely depends on your personal preferences but we would recommend you to not zoom in your map too much. A minimap is an often ignored piece of information in many games, and having an overview of the entire map and what’s going on in the round through the minimap can be game changing.
We like to set the minimap to ‘rotate‘ since it makes it easier to know where things are happening relative to your position at a glance, and for the same reason we like to set ‘keep player centered‘ to off. If you like a static minimap we would recommend to go for ‘based on side‘ to make it easier to orientate yourself.
The size and zoom settings are up to you, though (again) we’d recommend to have these settings set so you can see the entirety of the map, or at least most of the general area where the action happens.
Vision cones aren’t all that useful if you’re playing in a fully coordinated team, but for the vast majority of players that won’t be the case, so we definitely recommend to leave those on. That way you can quickly tell what angle your teammate is covering by looking at the minimap. Do note that these vision cones can sometimes be a bit misleading, so use them as a guideline for what your teammate is looking at instead of an absolute reference.
Best Crosshair Settings for VALORANT

In VALORANT you’ve got plenty of options to create and tweak your own crosshair, so some players will naturally be wondering what ‘the perfect crosshair’ is. The short answer is that there is no perfect crosshair; it all depends. We have an in-depth guide on what makes the best VALORANT crosshair as well as a guide listing the best VALORANT crosshair codes based on the pros, so these are good to help you get started.
The values in the image above are a good starting point for a crosshair. This crosshair is visible and not too thick so that it obscures vision, but just treat that as a starting point. There is no single ‘best VALORANT crosshair’ that works for everyone.
You can also use our VALORANT crosshair generator to test out how different crosshairs look in the game.
Best Resolution and Refresh Rate for VALORANT
This game is built from the ground up to be a competitive shooter, so you’ll want to take every advantage you can get. Getting yourself a high refresh rate monitor (and of course a PC that can output enough frames for you to fully enjoy the benefits of your monitor) gives you a leg up on opponents who do not have such gear, so if you’re serious about competitive shooter games we do recommend making the investment. You won’t want to go back to a regular 60 Hz monitor afterwards, trust us. Or if you don’t: trust the pros. Not a single professional player that we analyze is using a monitor with a refresh rate that’s lower than 144Hz.
Because VALORANT is made to run smoothly even on low end hardware it’s perhaps no surprise that our analyzed professionals (who generally have very powerful rigs) choose to run this game at 1920×1080. Lowering the resolution to net yourself a few more frames here and there isn’t really necessary with this game, unless you’re really struggling for frames.
Much like in CS, some pros like to play at stretched resolutions. You can always experiment with this, but it doesn’t give you any real advantages in VALORANT so feel free to stick to your native refresh rate if that feels most comfortable for you.
Most Used Refresh Rate
| Rank | Perc. | |
|---|---|---|
| 1 | 240Hz | 88% |
| 2 | 144Hz | 8% |
| 3 | 360Hz | 4% |
Most Used Resolution
| Rank | Perc. | |
|---|---|---|
| 1 | 1920×1080 | 70% |
| 2 | Other | 30% |
Best Audio Settings for VALORANT
In patch 2.06, Riot added HRTF to VALORANT. This is something that you will definitely want to enable, as it greatly increases the accuracy of positional audio. In doing so you should also disable any 3D audio processing programs (such as virtual surround and the likes) because those can interfere with HRTF.
Aside from that VALORANT doesn’t let you tweak all too many sound options so there isn’t a whole lot to say here. For minimal distractions we recommend turning off the ingame music (‘All Music Master Volume‘) under the sounds tab, as well as ‘Agent Flavor‘ under the Voice-Over tab. Music obviously doesn’t do anything for your competitive performance, and while the banter among agents (which is what the ‘Agent Flavor‘ slider controls) doesn’t really happen in crucial moments according to what we’ve seen it is just something that’s there for flavor so if you’re aiming for maximum competitiveness we recommend turning that off just to be sure.
Another thing that’s worth taking a look at is ‘VOIP Ducks Music.’ This will mute ingame music and all of that when your teammates are speaking so if you almost exclusively communicate via the game (instead of something like Discord or TeamSpeak) and you don’t want to turn off the music and banter this could be an ideal solution. In a similar vein you’ll find the the ‘VOIP Ducks Flavor VO‘ setting under the Voice-Over tab. This will lower the volume of the announcer when your teammates are speaking in the game but since the announcer can definitely give you crucial information (especially if you’re new to competitive shooters and find it a bit difficult to track everything) this isn’t a black or white setting according to us. It depends on what you prefer.
VALORANT Best Settings and Options – Conclusion
VALORANT is a game that’s been built from the ground up to be a competitive shooter, and as far as the settings and performance goes Riot have delivered. The game is pretty easy to run even for budget machines, so getting to competitive framerates isn’t a prohibitively expensive task. Of course you’ll want to squeeze out every last drop of framerate if you’re planning on being competitive at the game, so we do recommend experimenting with our settings a bit.
As far as the other settings go, VALORANT is an interesting game. There are plenty of ways to tweak your own personal settings, and none of them are hidden behind complicated procedures or anything like that. The settings we’ve gathered here should provide an ideal starting point for you to start crafting your own personal best configuration. As with all of our other guides we’ll update this guide regularly so do check back periodically to check for important updates!
Thank you for reading, and have fun with the game!
It would be nice to see the date last updated so that we can know how relevant this info is.
We try to update our guides every time a big update comes along. The stats on players etc. get updated then too. If a game is older and isn’t receiving significant updates to the graphical settings etc. we go over the stats every couple of weeks.