Introduction
With the release of Overwatch 2, Blizzard’s well-loved hero shooter has gone Free to Play, meaning that lots of newer players will be checking out the game. In addition to that, we’re also seeing the return of Overwatch 1 players. These returning players will obviously notice that the game looks and feels very similar to its predecessor, but of course things have changed under the hood as well as on the surface.
Whether you’re a returning player or completely new: we’ve released our analysts on the game and, armed with their expertise and data on what the pros are doing, they’ve come up with this list of optimal settings that you can use as a starting point to configure your own settings so you can get to shooting, healing, and tanking without any worries!
Quick Tip
We’ve marked the most important points of the guide in bold throughout. That way you can quickly scan the guide in order to get playing as quickly as possible. You can always come back later and learn about the whys and hows if you want.
Best Mouse Settings for Overwatch 2
Once you’ve bought yourself a great gaming mouse it is important that you use it correctly. Turning your DPI and sensitivity all the way up can cause your crosshair to jump all over the place while choosing a low sensitivity might give you problems in situations where you have to be mobile and make split second adjustments.
‘The perfect settings’ are very subjective and personal but we can give you some directions. We’ve analyzed what the pros are doing as far as mouse settings go so you have a starting point to come up with your own settings. Of course no one should blindly copy what the pros are doing, but if all pros are within a certain range it’s probably not very wise to be much above (or below) their overall sensitivity.
Quick note: there are a lot of reports on aiming feeling floaty and different in OW2. The first thing you should do when tweaking your game is go to the gameplay settings, navigate to miscellaneous, and enable ‘high precision mouse input’. This will make your aim feel a lot more responsive.
Fun Facts
Best Sensitivity for Overwatch 2
The sensitivity slider in Overwatch 2 is the exact same as it was in Overwatch 1. As such, there is no need to use a converter when going from OW1 to OW2. This also means that we can keep using the settings we’ve gathered from professional OW players over the years to use as a baseline.
There’s a reason most pro players use a relatively low sensitivity when compared to the average casual gamer. It just makes your aim much more consistent and less jittery. With a very high sensitivity you won’t be able to make those crucial micro adjustments to your aim, causing you to miss shots, for example. Since lots of players use different settings regarding DPI and ingame sensitivity we will use the eDPI to calculate the ‘true sensitivity’ of players.
Overwatch 2 is a very frantic and fast-paced game so in general you want your sensitivity and eDPI to be slightly higher than in some tactical FPS games that we analyze. There’s also the fact that aiming in Overwatch is more forgiving than it is in tac shooters: hitboxes are bigger, bullets are bigger, and some heroes don’t even require pixel perfect aim but rather melee-style aiming. For comparison’s sake: the average VALORANT pro has to move their mouse ~50 centimeters to do a 360 degree turn, in Overwatch 2 that’s only 35 centimeters.
Best eDPI for Overwatch 2
Tank players use a substantially higher eDPI, probably because their heroes generally don’t rely on having precise aim, and having a higher eDPI allows them to scan the battlefield faster and react to threats a bit quicker. In the early days of Overwatch 1, support players used to have a much higher average eDPI as well, but this isn’t true anymore as the best support heroes also rely on steady aim, so now the average support eDPI is even lower than that of DPS players, if only by a bit.
Obviously these are only averages. There’s a difference between a Widow expert who benefits from having a steady and precise eDPI setting and a Genji main who will probably want their eDPI to be higher to make those constant 180 turns easier to perform, for example. Take these settings for what they are: an average. You can use them as a guideline to find your own personal eDPI, but always make sure that you use something that you feel comfortable with.
eDPI stands for Effective Dots Per Inch and it’s the easiest way to compare sensitivities across the same game. eDPI takes two metrics (mouse DPI and ingame sensitivity) into account. This way you don’t end up with an endless amount of different settings which equate to the same sensitivity (for example 2 sens at 800 DPI is the same as 4 sens at 400 DPI) and you get an easy metric to compare true sensitivity.
Do take note that different games handle sensitivity in a different manner so we can’t use eDPI to compare true sensitivities across games. Doing that is a lot more complicated, but usually cm/360 is used for an easy comparison that doesn’t involve numerous calculations.
Aside from that we can definitely use eDPI to compare the true sensitivity of different players in the same game and that’s why we’re here. To calculate the eDPI you simply multiply your mouse sensitivity with the DPI of your mouse. Have a look at this example:
Player X is using a DPI of 1600 and a sensitivity of 3.37 The formula to calculate eDPI = DPI*Sensitivity. For player X, this would be 1600*3.37 = 5392
Average EDPI Values
Mouse DPI
DPI stands for Dots Per Inch. It measures how sensitive your mouse is. If you use 400 DPI your mouse moves 400 pixels for every 2.54cm or 1 inch your move your mouse. So, in essence a higher DPI means a higher mouse sensitivity. You can change DPI settings in your mouse’s software program or on the mouse itself, depending on the manufacturer. As you can see, the preferred DPI varies wildly, so the wisest thing to do is just pick something that you’re comfortable with, or (if you have an older mouse) check what the native DPI of your mouse is and set it at that.
There’s no benefit to having a super high DPI so there’s no need turn it all the way up. We wouldn’t recommend going over 1600. There’s no need, and some sensors introduce smoothing at higher DPI settings.
Best Overwatch 2 Video Settings
Modern games can be gorgeous to look at, that’s for sure, but if you want to gain a competitive advantage you’ll want as many frames per second (FPS) as possible while also eliminating unnecessary eye candy from your screen. We did some research and some in game testing and have come up with an answer that maximizes your FPS and minimizes the amount of clutter on your screen while still making sure that the game doesn’t look horrendous.
These days, 240Hz is considered to be the ‘competitive standard’, but you can also get away with using a 144Hz setup if you’re on a budget. We would definitely not recommend going any lower if you’re somewhat serious about competing in Overwatch 2, though. In games like these (with many fast-moving ingame objects) the advantages of higher framerates are even clearer.
Although we understand budget concerns and want to give tips on how to improve performance on lower-end computers, this guide is mostly to get the perfect settings for competitive performance. That’s why we’ve analyzed the pros. They are not making compromises.
Reducing visual clutter in Overwatch 2
We’ve read multiple reports online that aiming feels different in Overwatch 2 and that there’s a lot of visual clutter and distractions. We of course can’t help with some of the baked in design decisions, but there are ways to improve aim consistency and reduce visual clutter.
In order to reduce visual clutter, navigate to ‘accesibility’ and change the camera shake and HUD shake values. This will drastically reduce the feeling that everything’s shaking and bouncing on your screen, which can drastically help with steadying your aim and being more consistent. HUD and viewmodel bounce might be more cinematic and can aid with immersion when playing games, but if you’re playing a competitive game you’ll want to make sure everything is as consistent as it can be, so we recommend making these changes so that you can perform at your best.
Another handy tip is to turn down waypoint opacity in the ‘gameplay’ settings (under ‘user interface’). Depending in your position, the waypoint marker can be very large, and there will be instances where it’ll block your view of enemies. Turning it down will help spot those enemies without removing the waypoint marker all the way.
To further reduce graphical clutter and ensure aiming consistency, make sure to follow our video settings guide further down in the article!

Best Resolution and FOV for Overwatch 2
As opposed to CS:GO, VALORANT, and other games, the vast majority of players have historically (and currently) been playing Overwatch at 1920×1080. There is little to no advantage to using a lower resolution, and the game is nicely optimized, so we would not recommend going below your monitor’s native resolution.
We also recommend going for the maximum (103) FOV. Some people like to narrow their FOV so that they can have a more focused, tunnel-visioned view of the battlefield, but that’s not something that we generally recommend. Enemies can come from literally anywhere in this game, so having those extra lines of sight can mean the difference between blocking a devastating ultimate ability and not noticing it and having your team wiped.
Changing FOV also has little impact on the framerate of the game, so unless you really find 103 to be too overwhelming it’s a good idea to stick to the default settings when it comes to resolution and FOV.
Most Used FOV
Best Refresh Rate for Overwatch 2
Overwatch 2 is a fast paced game with a lot going on at any given time so it’s extremely important that you’re able to follow what’s going on in the game without any distractions. It’s for that reason that the vast majority of Overwatch 2 professionals are on 240Hz monitors along with, of course, a PC that can deliver at least 240 frames per second.
This is also what we recommend. If you have the budget, you can of course go for a 360Hz setup, but it’s a known fact that raising your FPS has diminishing returns so we don’t see 360Hz as an absolute requirement. Given the availability (and the still considerably difference between 144Hz and 240Hz) of 240Hz setups and monitors that’s definitely the refresh rate we recommend for competitive-minded OW2 players, however.
Most Used Refresh Rate
NVIDIA Reflex Low Latency Technology
Since Overwatch 2 is a Reflex compatible game and NVIDIA is the most popular GPU manufacturer in the pro scene by far we thought we’d add a small section to this guide. Feel free to read our full article here, or check out NVIDIA’s even more detailed post here.
What Reflex does is twofold: first, it allows developers to reduce the overall latency between the user and the game by forcing the GPU and CPU to work together in a more efficient manner, which reduces the render queue. This can quite drastically reduce your overall system latency, which is great news for competitive players.
Secondly, the Reflex Latency Analyzer allows you to measure your system’s overall latency, meaning that it becomes easier to identify possible bottlenecks.
If you’re interested in the full explanation we do recommend you to read the articles that we linked.
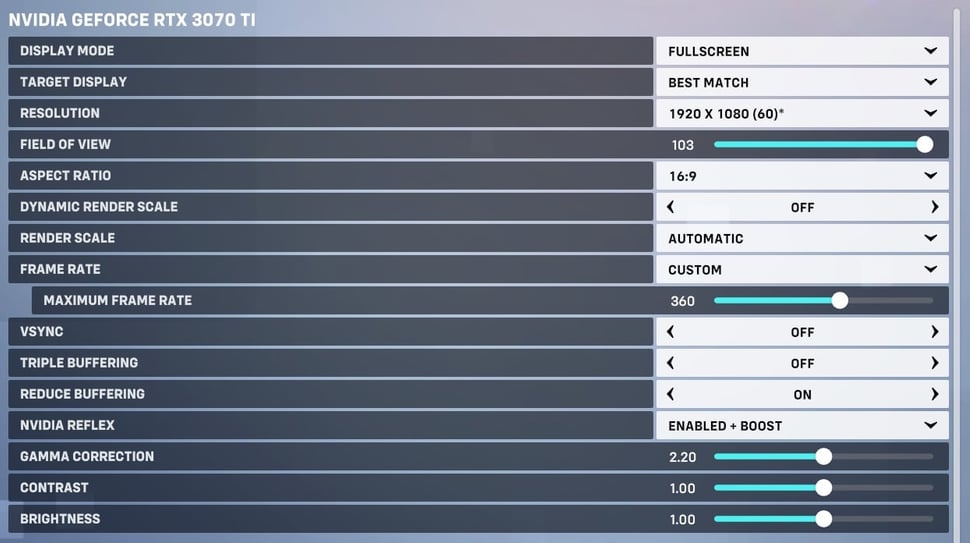
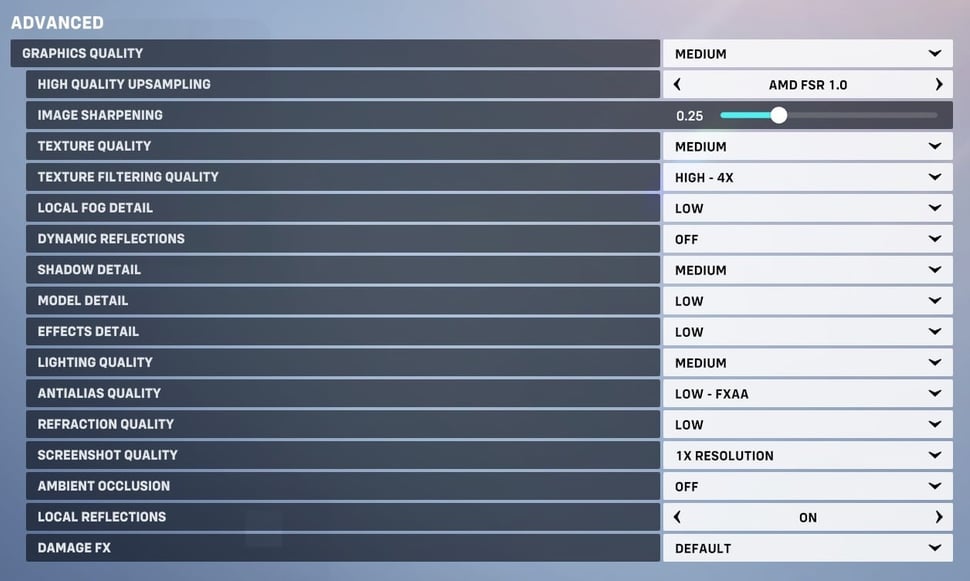
Overwatch 2 Video Settings
Below are our recommended Overwatch 2 video settings for an optimal blend of performance and visuals.
Best Overwatch 2 Settings and Options – Conclusion
Overwatch 2 is a very well optimized game, meaning that you can enjoy great framerates without having to downgrade your game so that it looks like a 90’s flash game. With that said: there are definitely a number of options and parameters that you will want to change up if you want to get the most out of your game, so it’s always a good idea to make sure that the game is perfectly optimized.
Overwatch 2 is of course a relatively new game, so we’ll be tweaking this guide (just like we do with our other guides) to reflect any changes that might happen with patches and updates.
Good luck out there!