Introduction
Rainbow Six Siege X is a game with a storied history, and it has been a high tier competitive game for years now. Despite not being as popular as games like VALORANT or CS2, the game has a dedicated following of hardcore players and fans. If you want to stand out in such a crowd, it’s imperative that you use the best Rainbow Six Siege X settings.
In this article we’ve compiled the ingame settings and sensitivity settings of professional Rainbow Six Siege X players. This is the perfect article to use if you’re just starting out and looking to get your settings in order, but it also contains a lot of useful information for veterans of the game.
Best Rainbow Six Siege X Video Settings
| Setting Name | Setting Value | More Info |
|---|
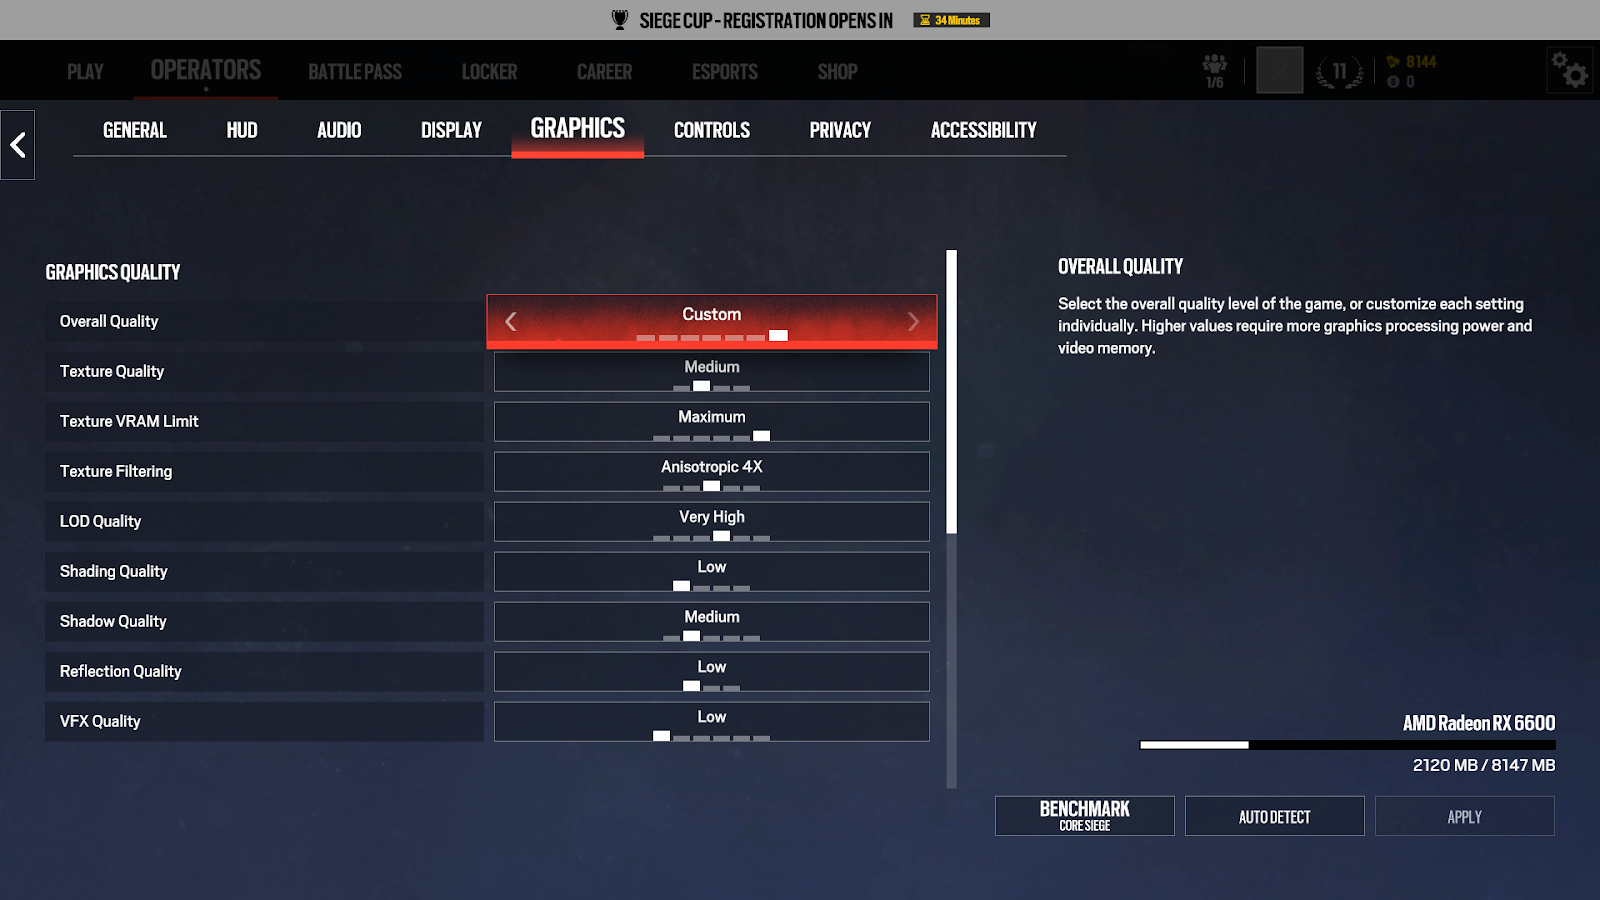
| Texture Quality | Medium | This ensures that the game doesn’t look too grainy and that you can still spot enemy players in a pinch. |
| Texture Filtering | Anisotropic 4x | We suggest putting this at Anisotropic 4x for an optimal mix between having sharp textures everywhere and performance. If you really need the frames you can turn this down to 2x but the difference isn’t that significant. For visibility reasons we don’t recommend to go for Linear. |
| LOD Quality | Very High | This is one of the most important settings in the game. Setting this to low will make the heads of enemies appear as a triangle which can make it much harder to distinguish them and hit them. There’s not a whole lot of FPS impact between Ultra and Low so that’s why we recommend Very High or Ultra. |
| Shading Quality | Low | This is more of an eye candy setting and it hogs performance, so settings this to Low has no real effect on visibility and will net you around 20 frames per second. Medium is also an option. We don’t recommend High as that simply eats too many frames. |
| Shadow Quality | Medium | Set this to Medium. Low turns off dynamic shadows (which means that you won’t be able to see player shadows) and the higher settings eat away at your frames so Medium is an ideal compromise. Definitely do not go lower than Medium though, or you’ll put yourself at a competitive disadvantage. |
| Reflection Quality | Low | Low gives you a pretty nice performance gain and the higher settings only make the game look prettier (they don’t make enemy reflections appear on shiny surfaces or something, for example) so there’s no need to turn this up. |
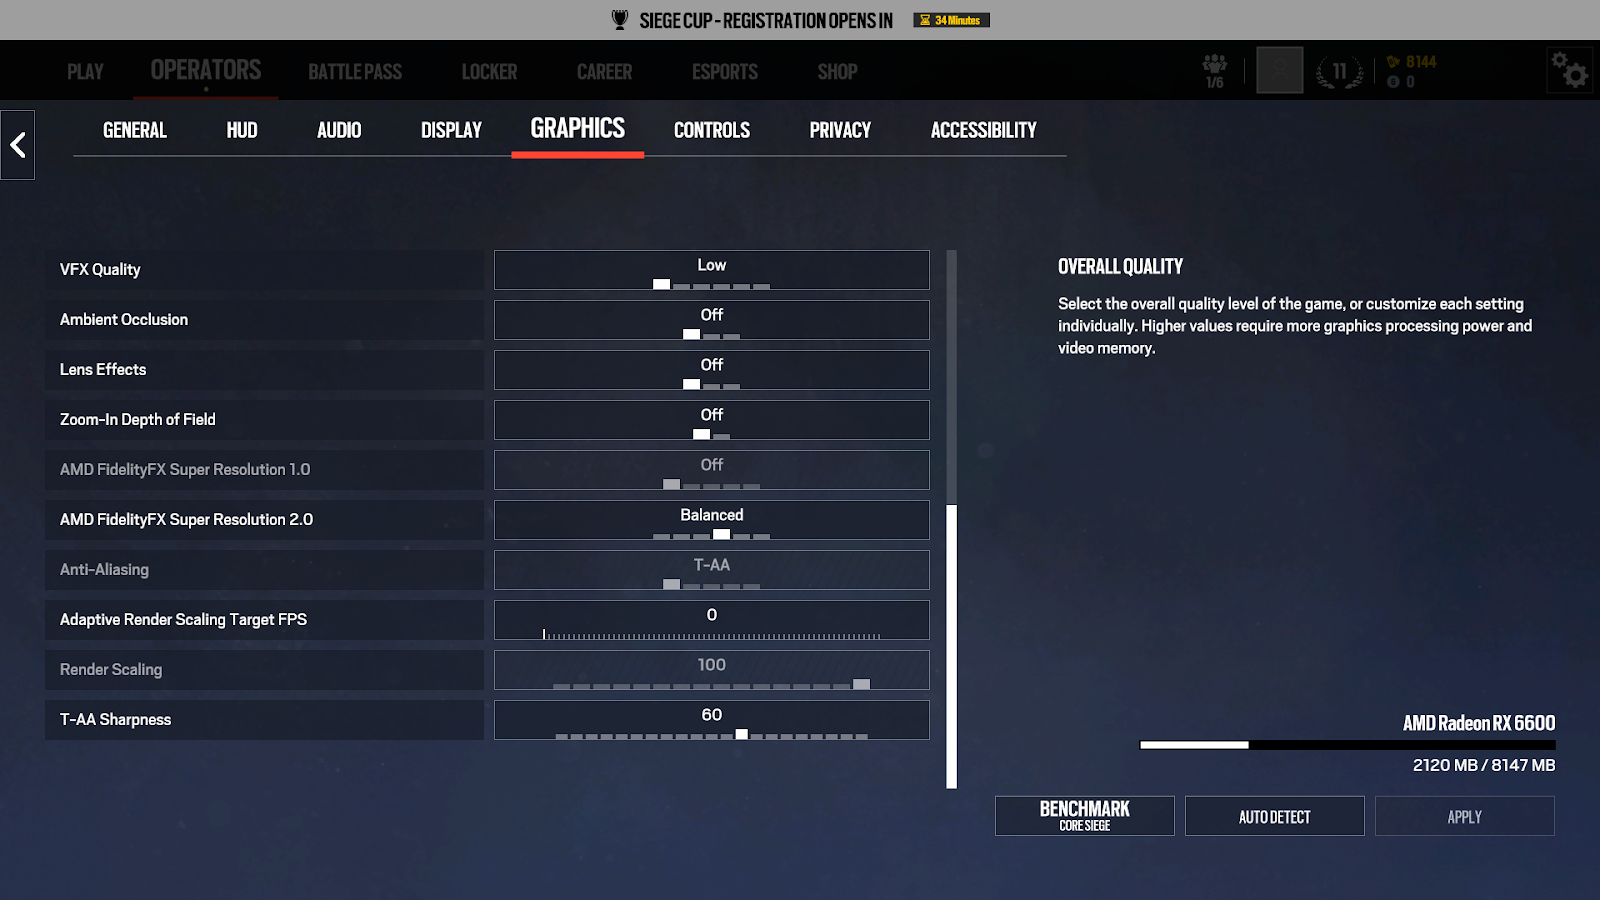
| VFX Quality | Low | Controls how particles, decals, and debris look. Mostly an eye-candy setting. |
| Ambient Occlusion | Off | This can make games look very beautiful, but ultimately it does nothing for your competitive performance so leave this off to save a bunch of frames. |
| Lens Effect | Off | This is another eye candy setting. |
| Zoom-In Depth of Field | Off | This setting blurs the edges of your screen slightly when aiming down a scope or sight. It does make the game look a bit more realistic but obviously you don’t want to introduce blurring to your game for any reason. |
| AMD FSR/NVIDIA DLSS | Personal preference/system-dependent | Upscaling works wonders in getting more frames out of your system. It renders the game at a lower resolution, then scales it back up to native, resulting in a performance increase without significant image loss.
Try out the different Presets (Quality, Balanced, Performance). The lower you go (like Ultra Performance), the worse the quality gets.
Note: You need to set Anti-Aliasing to T-AA if you want to use Upscaling |
| Anti-Aliasing | Off (or T-AA if you want to use upscaling) | We recommend you to turn this off. The game doesn’t look like a garbled mess with the AA off and you get a nice performance gain from leaving it off. |
| Adaptive Render Scaling Target FPS | 0 | Changes your resolution to match the frames you set it to. It causes issues with visuals, so we recommend leaving it off. Upscaling is better for this. |
| Render Scaling | 100 | Use upscaling if you want more performance. Lowering the render scaling makes the game look very blurred. |
| T-AA Sharpness | 50, increase accordingly if you are upscaling | Helps sharpen things up after Anti-aliasing is applied. |
Mouse Settings
Rainbow Six Siege X isn’t a game where you need to have a ton of abilities or cooldowns at the tip of your fingers, so a relatively simple gaming mouse is pretty much all you need. We do recommend turning Raw Input on, as that’ll ensure that your mouse’s movements are ported over to the game without issues.
Mouse DPI and Sensitivity
As you may or may not know: absurdly high DPI counts are only used for advertising purposes. This is evidenced by the fact that the highest analyzed DPI with the Siege professionals is set at 3200. The vast majority of our analyzed R6 pros play at either 400 or 800 DPI. This is for a multitude of reasons: firstly because you don’t want your overall sensitivity (eDPI) to be too high as that will cause your aim to be jittery and inconsistent, and secondly because even flawless sensors can introduce smoothing at very high DPI settings.
We thus recommend to set your DPI at anything between 400 and 1600, coupled with a reasonable ingame sensitivity. What works for you is going to be personal of course.
Most pros also use the same sensitivity setting for their vertical and horizontal aiming, and we suggest you to do the same as that greatly increases consistency when aiming.
We normally put the average eDPI of pro players in our guides, but that’s nearly impossible to do for this game given that different sensitivity multipliers result in vastly different actual sensitivities, regardless of DPI and ingame sensitivity.
Sensitivity Multiplier
If you check out our R6 Pro Settings and Gear List you’ll see that some pro players are using a different ‘multiplier.’ As a developer of the game explains; the default value for this ‘MouseSensitivityMultiplierUnit’ is 0.02 which means that if your sens is set to 50 the game will use 50*0.02 (equaling ‘1’) to multiply your mouse position delta. If you change the MouseSensitivityMultiplierUnit value to 0.01 then, the precision of the sensitivity slider doubles, but you lose half the sensitivity range.
In practice this means that, the smaller this mouse sensitivity multiplier number is, the more precise control you have over the ‘actual sensitivity’ of the game. As an example: 50 sensitivity with the default multiplier of 0.02 results in an ‘actual’ sensitivity of 1, while 50 sensitivity with a multiplier of 0.00223 results in a much lower actual sens of 0.1165. The next step on the slider (51 sens) results in an actual sensitivity of 1.02 with a the default multiplier, while 51 sens at 0.00223 results in 0.118.
At default every step on the ingame slider represents a change of 0.02 in actual sensitivity, while at 0.00223 each step represents a change of just 0.0015, which obviously allows for more precise control of the sensitivity.
In short: setting the mouse sensitivity multiplier to a lower value means that the sensitivity range you can select from in the game becomes much lower, but much more precise. How much lower and how much more precise depends on the actual value you’ve chosen, but we’ve put the most often used multipliers to the right. Most pros have this set to the default value though, so unless you really can’t find a perfect sensitivity you don’t have to really worry about this part.
Changing MouseSensitivityMultiplierUnit
You can find this setting under Documents > My Games > Rainbow Six – Siege > folder with a bunch of letters and numbers > GameSettings.
Simply double click on GameSettings and you’ll find the setting under ‘INPUT’. Don’t forget to save the file and restart your game for the change to take effect.
ADS Sensitivity
There are a lot of ways for you to tweak your sensitivity in this game, and it can all seem very daunting if you take a gander at some online communities, but the vast majority of players (including pros) just use the ingame settings these days as they work fine. No need to go mess around in game files and what not. We recommend you to just experiment a bit with the ADS values (or use our settings as a starting point) until you find something that works for you.
FOV
As you can see, the majority of professionals are on the maximum FOV (Field Of View) of 90. This has a number of obvious examples such as a bigger field of view for you to spot enemies or obstacles, but it can eat away at your framerate and some players like the more focused ‘tunnel vision’ aspect of a narrower Field Of View combined with the fact that enemies take up more of your screen if you’re gaming with a smaller FOV.
Regardless, no pro player leaves the FOV to the default 60 percent, so we do definitely recommend you to set this higher. The average is definitely on the higher side, so it’s a good idea to start at 90, and if you feel a bit ‘overwhelmed’ or you want a more narrow and focused experience you can start turning down your Field Of View.
| Rank |
|
Perc. |
| 1 |
90
|
57% |
| 2 |
84
|
18% |
| 3 |
Other
|
25% |
Conclusion
Rainbow Six Siege X has quite a bit of options for you to consider and it can quickly get really technical if you’re doing a deep dive into all the sensitivity options for example, but luckily those are optional as the game itself offers plenty of customization options by itself.
This guide has been made by doing our own testing, as well as analyzing what the professionals are doing, so this should be an ideal guide for you to get started with your own setup. As with everything you’ll want to make sure that it all works for you but this should be an great starting point for every Rainbow Six player.
Thank you for reading!
Former semi-pro gamer turned writer, product reviewer, and community manager.
when will this be updated for siege x? there are some newer settings to configure